


Mechanical Watch: Exploded View
Mechanical Watch: Exploded View
In May 2022, someone posted to Hacker News Bartosz
Ciechanowski's
blog post
explaining how mechanical watch movements work. Since then, his blog has
been my absolute favorite corner of the Internet. His posts are not just
well written and easy to follow, the accompanying interactive
illustrations are magnificent.
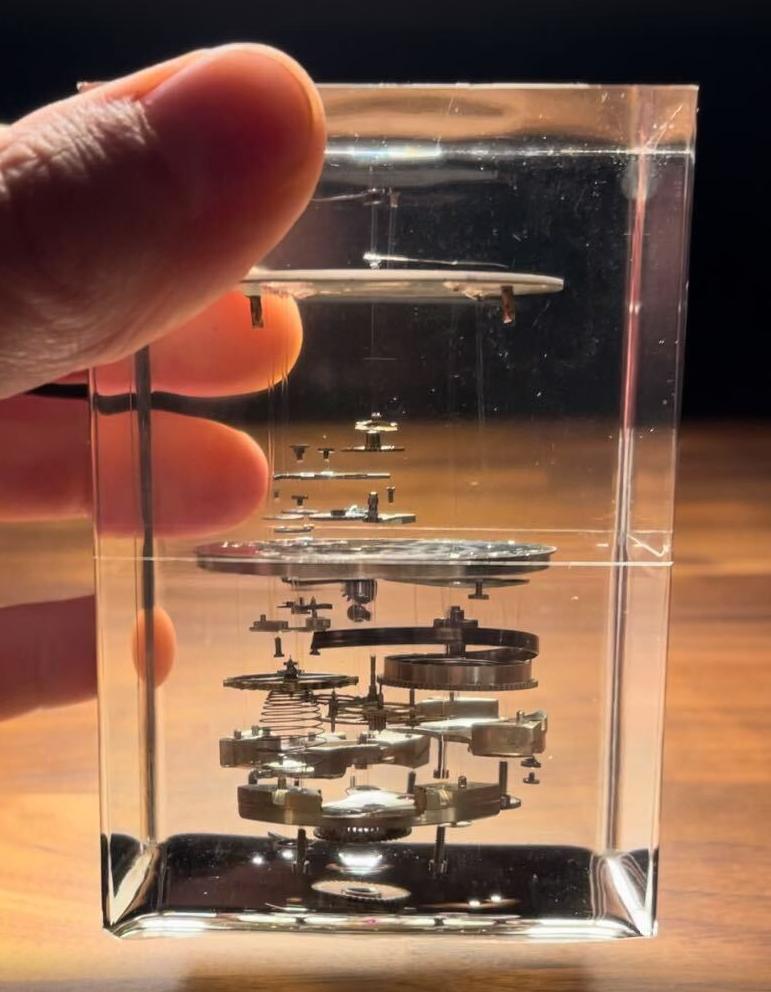
The first illustration in his blog post about mechanical watch movements
allows you to "explode" a ticking mechanical movement and rotate it to
inspect its every component from any angle. I owe my foray into the
hobby of watchmaking to Bartosz, but that's not what this blog post is
about. Instead, I want to scratch an itch I've had for years now: How
cool would it be to hold an exploded view of a real mechanical
watch in your hand?
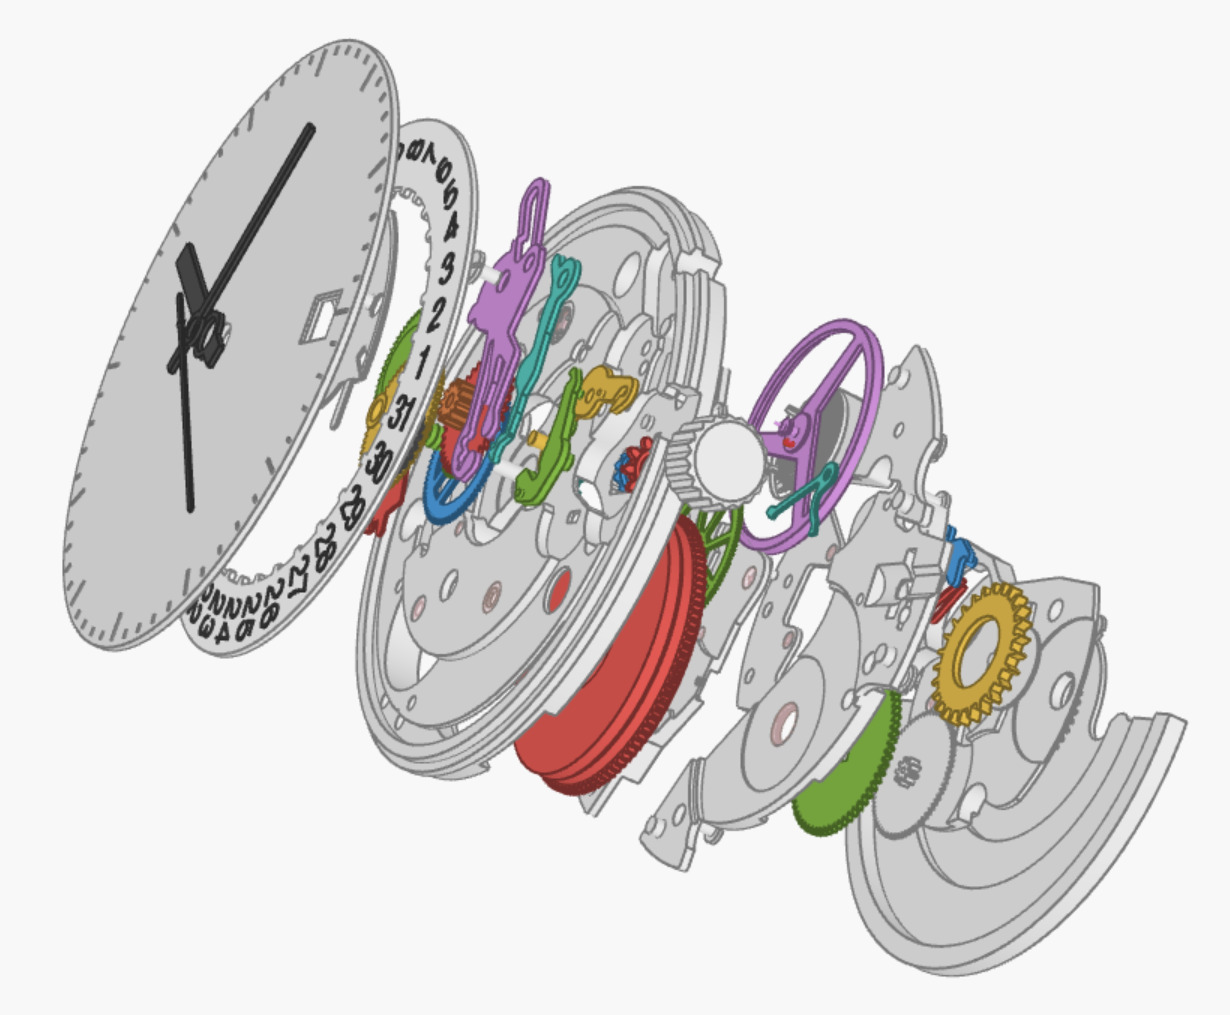
Screenshot of the exploded view render from Bartosz Ciechanowski's blog post.
Apparently, nobody builds such models
I figured that surely, someone has had this idea and built it before. On
eBay you'll find cubes of resin embedding various random components from
mechanical watches, but they are typically sold as "steampunk art" and
bear little resemblance to the proper assembly of a mechanical watch
movement. Sometimes, you'll find resin castings showing every component
of a movement spread out in a plane like a buffet---very cool, but not
what I'm looking for. Despite my best efforts, I haven't found anyone
who makes what I'm after, and I have a sneaking suspicion as to why that
is.
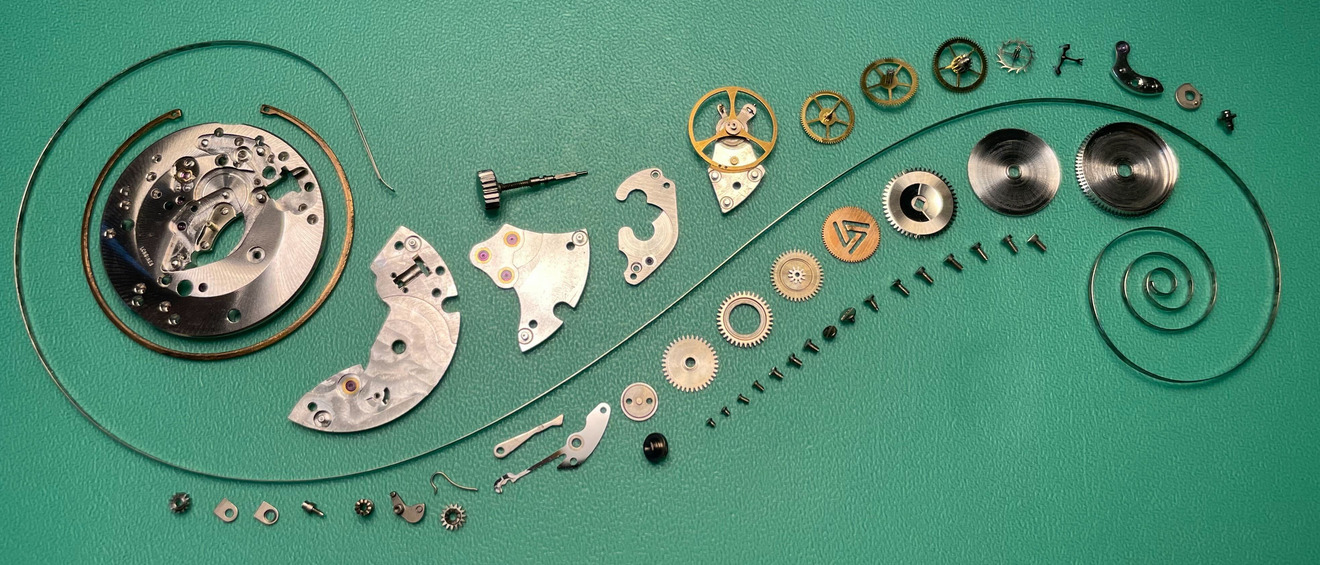
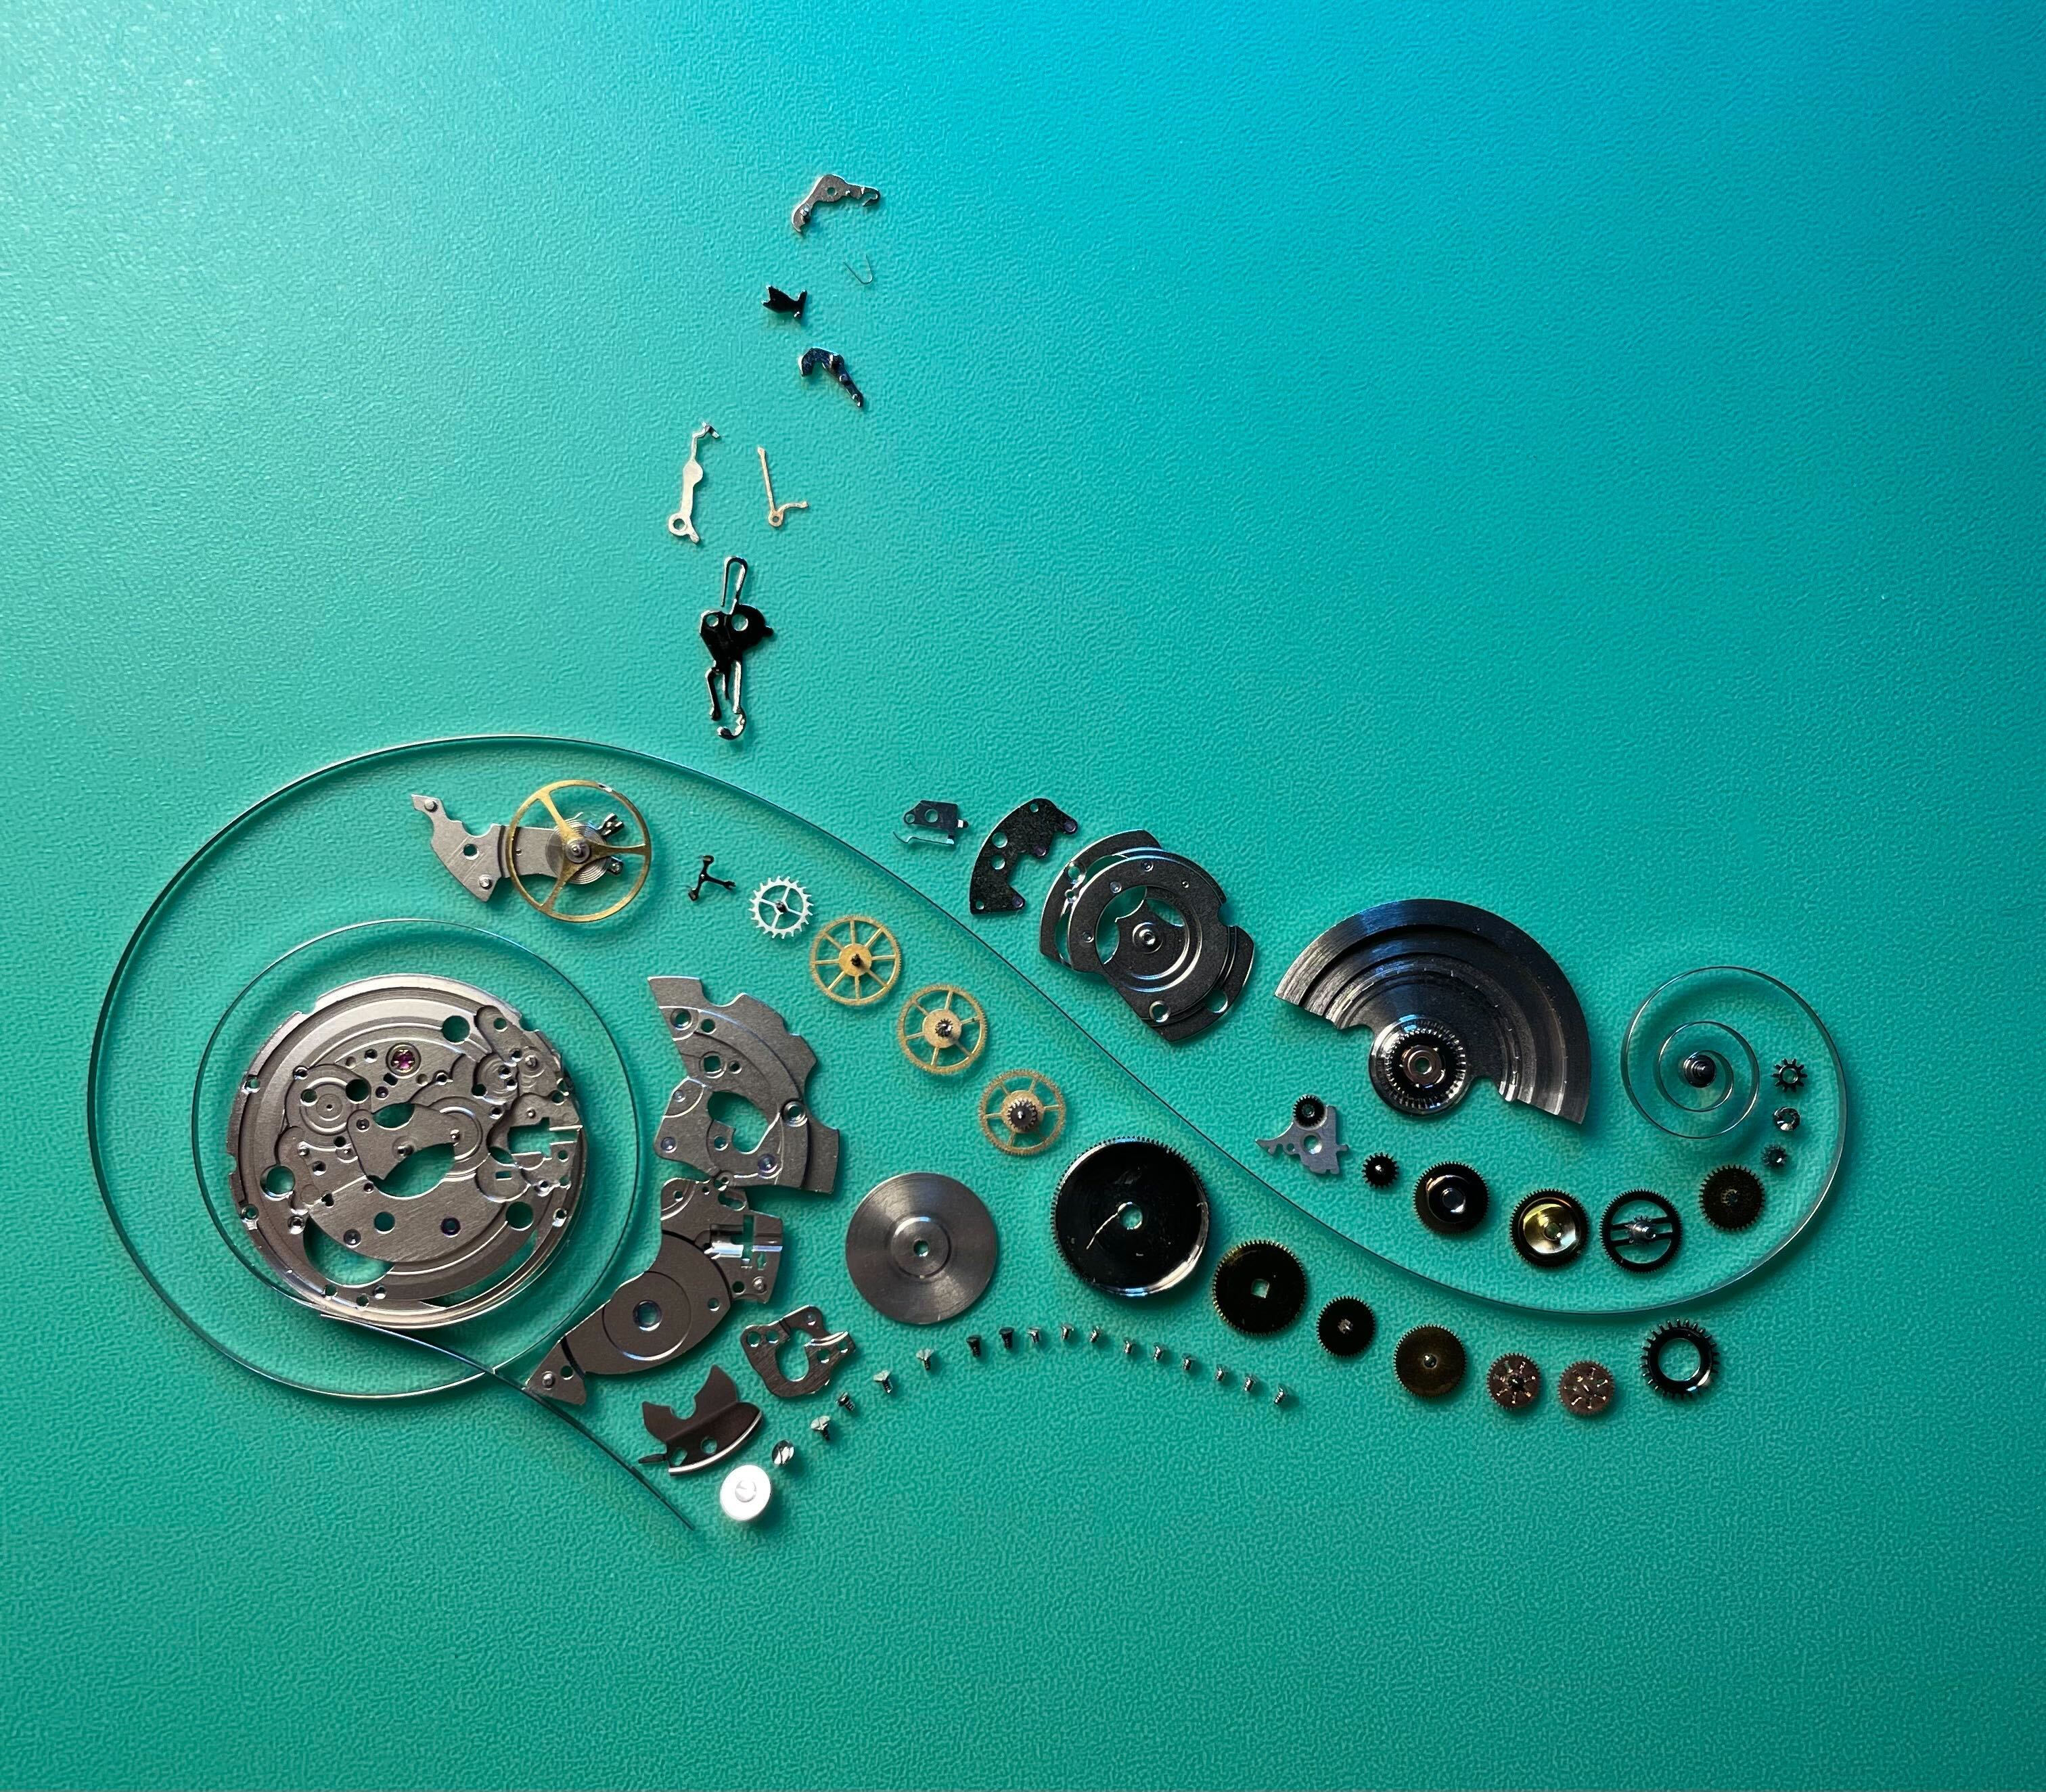
Every component making up the movement of a beautiful 1960's Longines Flagship wristwatch I worked on recently, laid out "buffet style".
Building an exploded view of a mechanical watch movement is undoubtedly very fiddly work and requires working knowledge about how a mechanical watch is assembled. People with that skillset are called watchmakers. Maker, not "destroyer for the sake of art". I guess it falls to me, then, to give this project an honest shot.
...how do you build such a model?
Here comes my favorite part: jumping head-first into a project requiring
a set of skills I don't even know exist, let alone possess, following a
process that develops as the project evolves. So how would one go
about building a real-life exploded view of a mechanical watch movement?
The first thing to consider is what type of mechanical watch movement to
"explode". Although he doesn't explicitly say, I think Bartosz
Ciechanowski's blog post is based on the ETA caliber
2824-2 mechanical watch movement (or one of its many clones, such as
the Chinese PT5000). This is a very robust and popular automatic
(self-winding) mechanical wristwatch movement found in many watches.
It's considered one of the all-time "workhorse" movements of the
industry. I highly encourage the curious reader to check out this YouTube video
of a very skilled and equally witty watchmaker servicing a Hamilton
watch featuring this exact movement. The video will also reveal how many
absolutely miniscule components make up the ETA-2824, making it less
than ideal for my initial prototyping. A larger and simpler movement
would be much better.
Luckily, in the late 1800's to early 1900's, many people carried a
pocketwatch about their person. However, as smaller wristwatches gained
popularity among men, beginning around the first world war with trench
watches, pocket watches lost their value as timepieces. Many were melted
down to reclaim the gold used to case the movement. Today, you can find
gorgeous, hand-engraved movements from the turn of the 20th century on
eBay
for next to nothing.
Pocketwatches are the simplest mechanical watch movements out there:
they typically don't have any date complications, aren't self-winding,
and usually don't even have a central seconds hand---that's a
relatively modern feature. There's a reason budding watchmakers start
out practicing on pocketwatch movements.
Now for the hard part: How do you suspend 50-100 tiny components to form
an exploded view of the assembly?
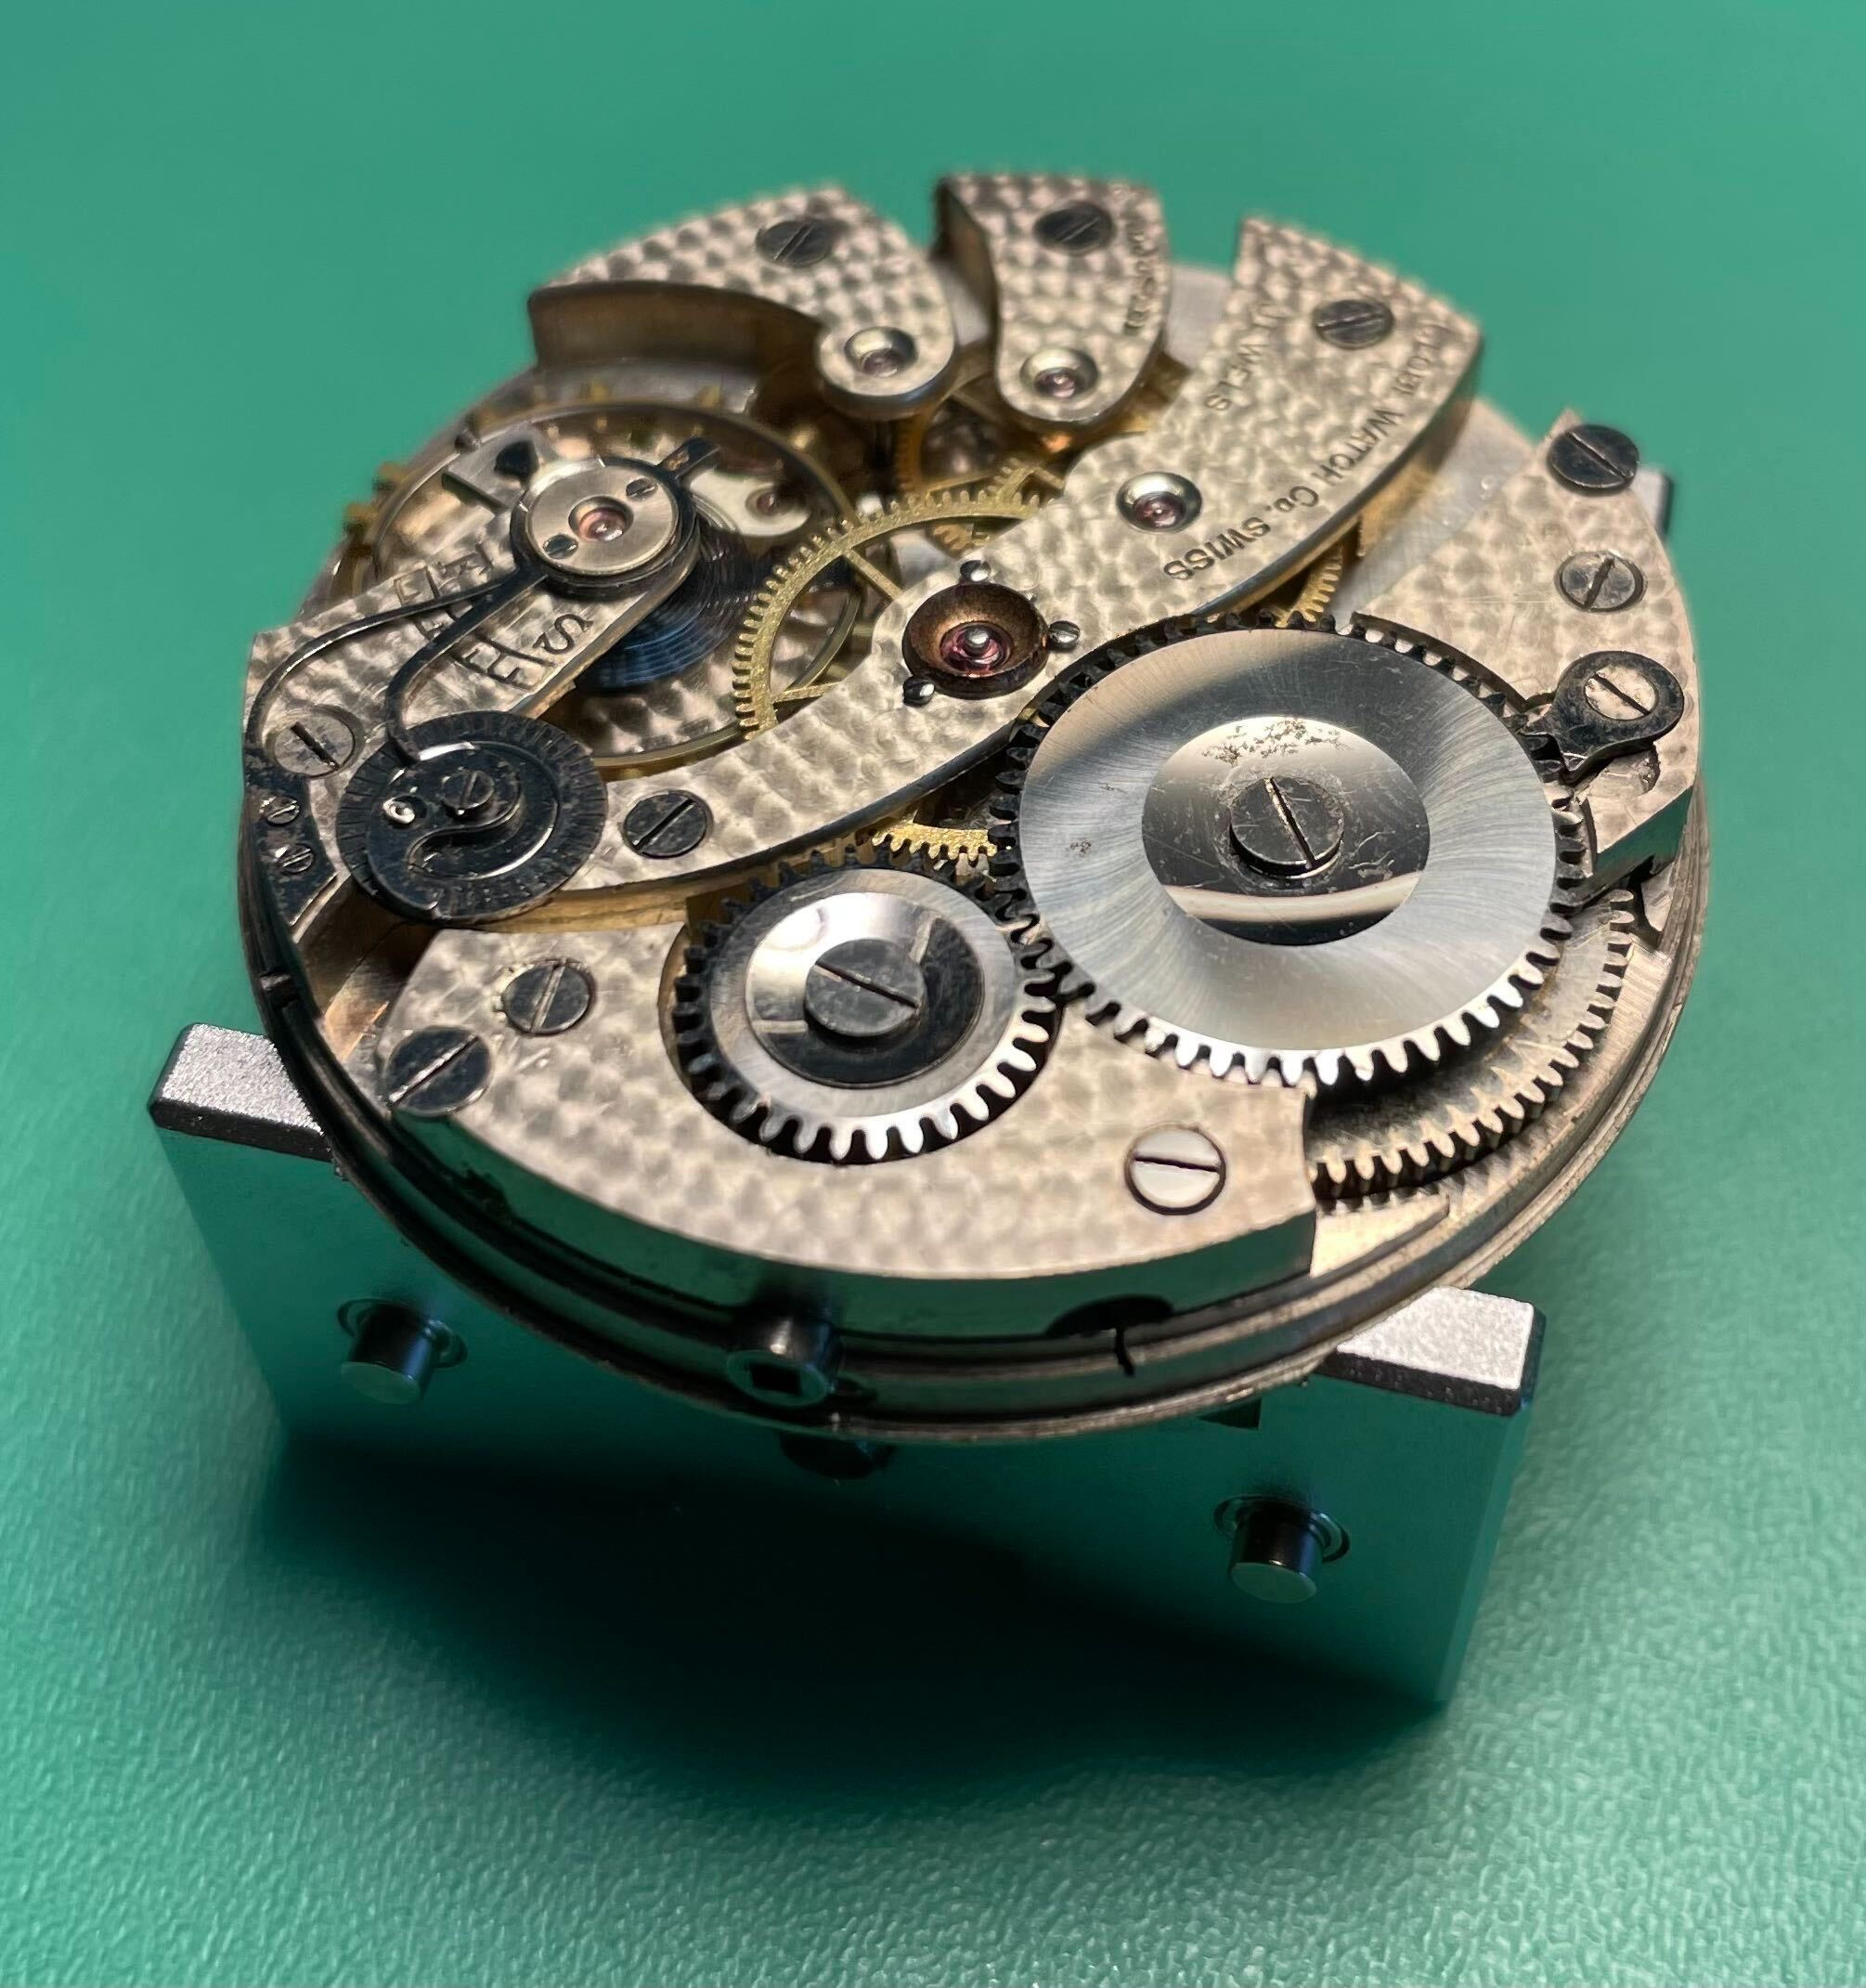
A beautiful early 1900's pocketwatch movement from eBay. $20 for a piece of horological art.
Layered resin casting
The model I'm planning to build must stand up to being handled, which means it must be solid. In turn, that probably means that I need to cast my components in clear epoxy resin. My first idea was to build the exploded model up, layer by layer, letting the resin cure between each layer. To save time, I experimented with clear resin that cures when exposed to UV light. There are several reasons why this did not work:
-
The resin I purchased ended up with a heavy yellow tint after curing.
-
My puny UV flashlight took forever to cure a pour even 1 mm deep.
-
The seams between layers are very visible.
The first two problems can probably be solved by throwing money at the
problem, but the last issue seems to be a problem with varying indices
of refraction throughout my casting. The resin art community is
well-aware of this problem, and the suggested solution is to pour the
next layer of resin before the previous layer has fully cured. This
supposedly helps the two layers fuse, and should make the transition
between layers much less pronounced. Unfortunately, UV resin seems to
cure from the outside in, meaning I needed to use "regular" two-part
epoxy instead.
To achieve the effect I want, I need around 20 layers for a regular
pocket watch movement. If I were to cast each layer in a transparent
container, adding components and epoxy as the previous layer was
half-cured, I would be doing nothing else for a solid week. Instead, I
figured my best bet was to cast all 20-or-so layers at once, and stack
them together once the epoxy was semi-cured. So, my next project was to
order some casting silicone and cast myself a mold suited to casting
thin disks of clear epoxy. A baking tray studded with poker chips formed
the ideal mold for casting the silicone.
My resin disks solved problems 1 and 2 above, but problem 3 is still
unsolved. In addition, this was a very messy and challenging way to
cast resin: the half-cured disks are floppy, resin runs everywhere and
bubbles get stuck between the layers. I bought a small vacuum chamber to
combat the bubble issue, but escaping gas weaked havoc on the disks of
resin. I learned enough about resin castings to finally realize that
layered casting is not the way to go.
1st attempt: embedding some nails in layers of UV resin.

2nd attempt: Embedding more nails in disks of clear resin in a silicone
mold...
yeah, no.
Suspending each component with fishing line
It took a while to accept that the only hope I had was to cast the
entire model at once. This is difficult because I need to somehow
suspend each tiny component in a way that is robust enough for me to
pour resin all over it and then pull out any air bubbles.
Scarred and burnt by resin's index of refraction, I went looking for
very thin rods of plastic or acrylic that I could cut to length and glue
my components to. Fishing line fits the bill. Specifically, monofilament
nylon leader used in fly fishing. It comes in many thicknesses, has an
index of refraction very similar to epoxy resin, and is cheap. The only
major challenge with using fishing line is that it "remembers" its
spooled shape, so every segment I cut off has a slight bend to it. I was
able to remedy this somewhat by stringing it repeatedly across the grill
pan in my oven and baking it at 150°C (300°F) for an hour or so. When done,
the middle segments are reasonably straight and significantly stiffer
than what I started with.
The assembly process actually resembles "proper" watchmaking a lot. Of
course, tweezer control and steady hands are important. But applying
tiny drops of CA glue to components with a pinhead is a lot like
applying oil to bearing surfaces and jewels. I just find it amusing to
do it with glue instead of oil---CA glue being the complete
opposite of a lubricant.
Armed with a pair of helping hands and a set of self-closing tweezers, I
found the process of building up the exploded model of a scrap watch
movement to be very satisfying.
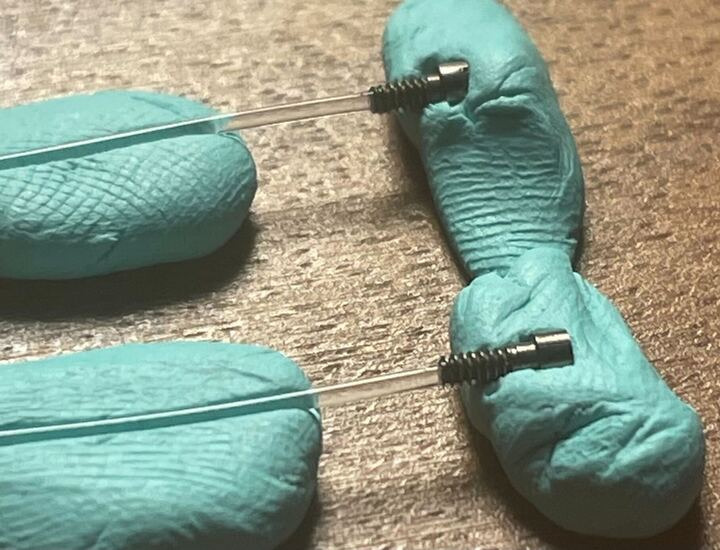
0.7 mm monofilament fishing line attached to bridge screws.
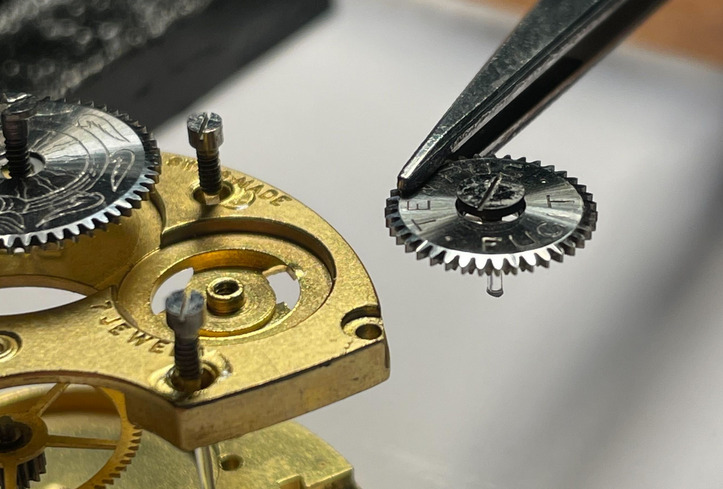
Monofilament fishing line maintains the distance betwen components. A jig holds everything still while the CA glue hardens.
Resin casting at home
At this point I've tried a number of different epoxy resins claiming to
cure crystal clear. As far as I can tell, they all turn out appreciably
clear. Their main differences are viscosity, cure time and how much air
they trap when mixing. Some resins claim to expel bubbles when curing.
They manage this to some extent, but to get completely clear castings
you either need a vacuum chamber to pull out all the air from your cast,
or a pressure chamber to completely squash any pockets of air. I went
for a vacuum pump because it's a fun thing to have around (boiling water
at room temperature doesn't get old). Another benefit of the vacuum pump
is that you don't need to leave your cast in the chamber for the entire
cure time. My castings have a lot of voids that love to trap air, and
the vacuum chamber does a good job of pulling out the trapped air.
My casting method goes like this: Mix enough of part A and B of your
resin to fill the mold plus 10–15 %. Mix thoroughly for 3 minutes. Pour
the resin into another mixing container to ensure that no unmixed resin
is stuck to the walls of your container. Use a fresh stirring stick, and
mix for another 3 minutes. Pull the whole container under vacuum (I
manage around -0.96 bar) and leave it there for 30 minutes. Depending on
your resin, the froth may very well overflow your mixing container:
cycle between pulling a vacuum and letting air back in a couple times to
pop most of the bubbles.
Now pour the resin into the mold and go through the vacuum process
again. This time, most of the bubbles you're pulling out come from
around the embedment, not from air trapped in the resin, which helps
keep the frothing down.
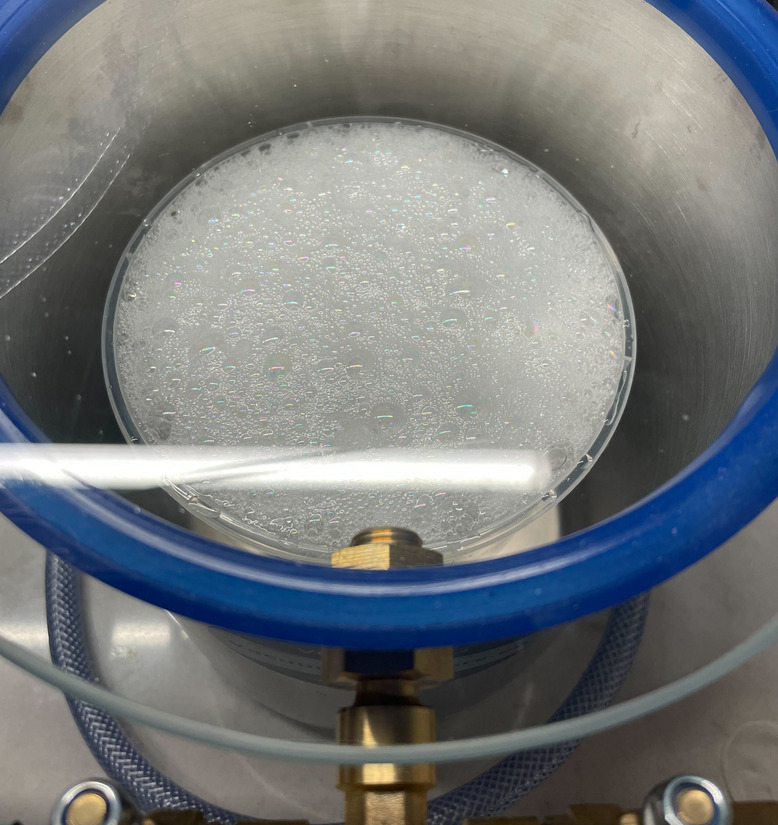
Some resins froth up to several times the liquid volume under vacuum! Make sure there's enough room to accomodate this.
Prototype #1: lessons learned
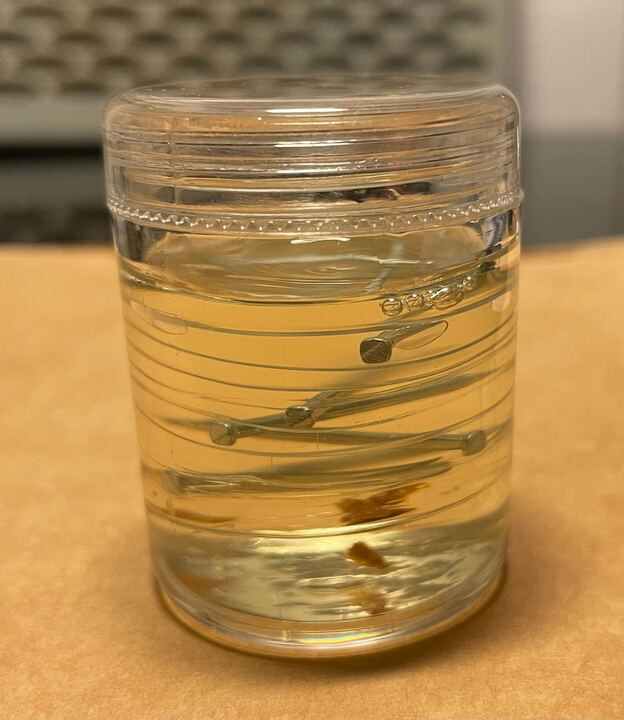
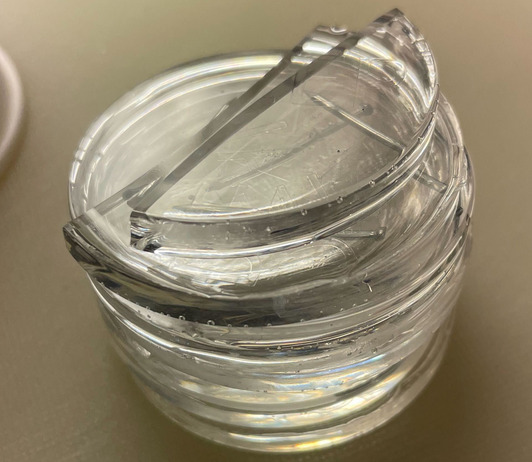
My first somewhat promising cast was in a borosilicate class cylinder. I won't dwell on the looks of this, because I mostly wanted to experiment and answer a few burning questions with this prototype:
- Q: How visible is the fishing line in the final result?
- A: Not very! It's visible in the right light, but I don't think I'm able to do any better.
- Q: Does CA glue interfere with the resin in any way?
- A: Most resin datasheets say that CA glue can interfere with the resin's curing process, but I can't tell from this test.
- Q: Does casting in a cylinder make sense?
- A: Definitely not. Light refracts on the curved cylinder surface making it difficult to understand the geometry inside, defeating the purpose of the model. Cast in a cube.
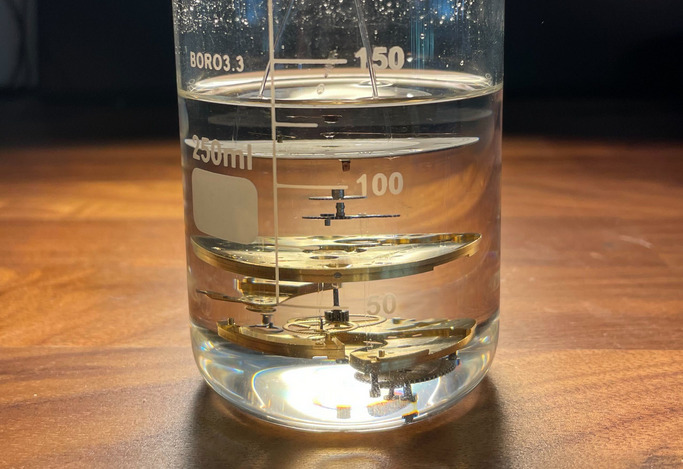
First prototype cast. Fishing line all but disappears in the resin.
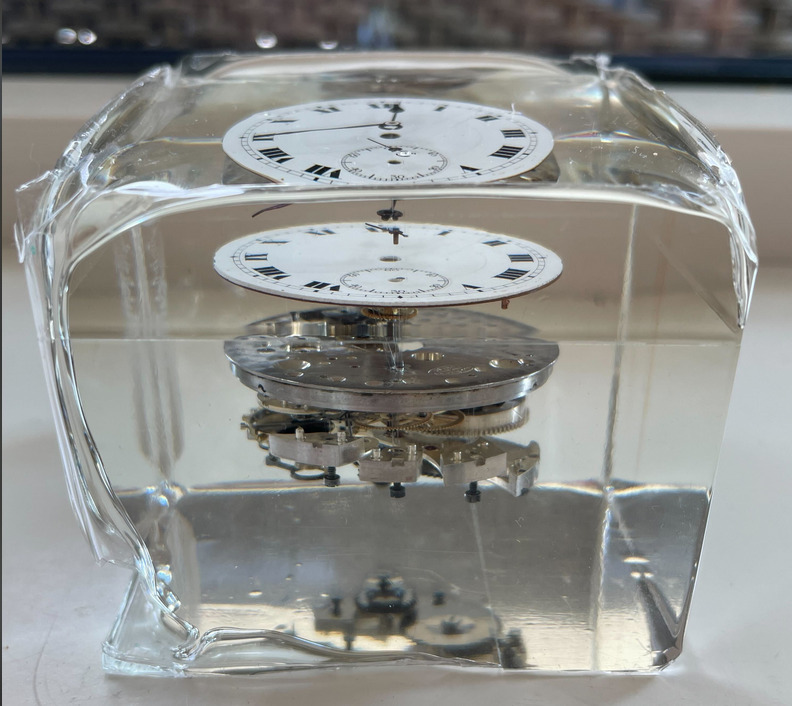
Prototype #2: promising results
At this point I have settled on a somewhat structured process.
Disassemble and clean
Start with a clean, disassembled movement. For instructions on how to properly disassemble and clean a watch movement, I highly recomment Mark Lovick's Watch Repair Course. Assemble the train of wheels with their bridges and seize them by depositing small amounts of CA glue on the pinions. Just like with the watchmaker's oil, a sewing needle with a flat spot is perfect for picking up a small droplet of CA glue and depositing it where it's needed. Capillary action wicks it between the components. Less is more when it comes to CA glue: the bond between surfaces is stronger when no excess is used, and the cure time is around 30 seconds even without the use of an activator.Assemble trainwheel side
Work starts on the train wheel side of the movement (often called the watchmaker's side) because that's where most of the complexity lies. While working here, the movement can rest in a movement holder. I attach long strands of fishing line to the end of each of the bridge screws. Self-closing tweezers hold the bridges in place above where they seat on the mainplate, and the screw/fishing line combo is threaded through the screw hole in the bridge into the corresponding holes in the mainplate. More glue binds the bridges to the fishing line.Flip and assemble the dial side
Before starting work on the dial side of the movement, it must be flipped over. I transfer the assembly into the jaws of some tweezers and apply closing force with a rubber band. The tweezers are clamped by "helping hands" glued to a piece of cardboard which allows me to spin my work around. Work continues similarly on the dial side. Finally, some thin transparent nylon sewing thread attaches the mainplate to a pegwood stick that allows me to suspend the whole assembly over a mold, ready for casting resin.Make the mold, prepare and pour resin
Speaking of the mold: I bought some 2 mm thick 20x30 cm acrylic sheets. Foamcore or wood could work as well, but I don't want the vacuum pump to pull air from the mold into the casting. I cut them into 7x10 cm rectangles and lined them with "epoxy mold tape" (fancy packing tape that epoxy resin does not bond to). Then I used some Tec7 construction adhesive to form a cube.-
I struggled with attaching subassemblies to the mainplate because I need to precisely control the distance between the subassembly and the target surface: too snug and the assembly ends up crooked, too far away and the glue doesn't adhere properly. A proper lab jack (tiny scissor lift) might solve this, so one is on the way.
-
The resin shrunk a lot while curing, most likely because it overheated. I'll focus on proper airflow for my next cast.
-
People noted that it's difficult to see between the components, so I'll "explode" the next model even more.
-
The hands are set to an invalid time. 10:10 is the way to go.
Protoype #3: nailing the technique
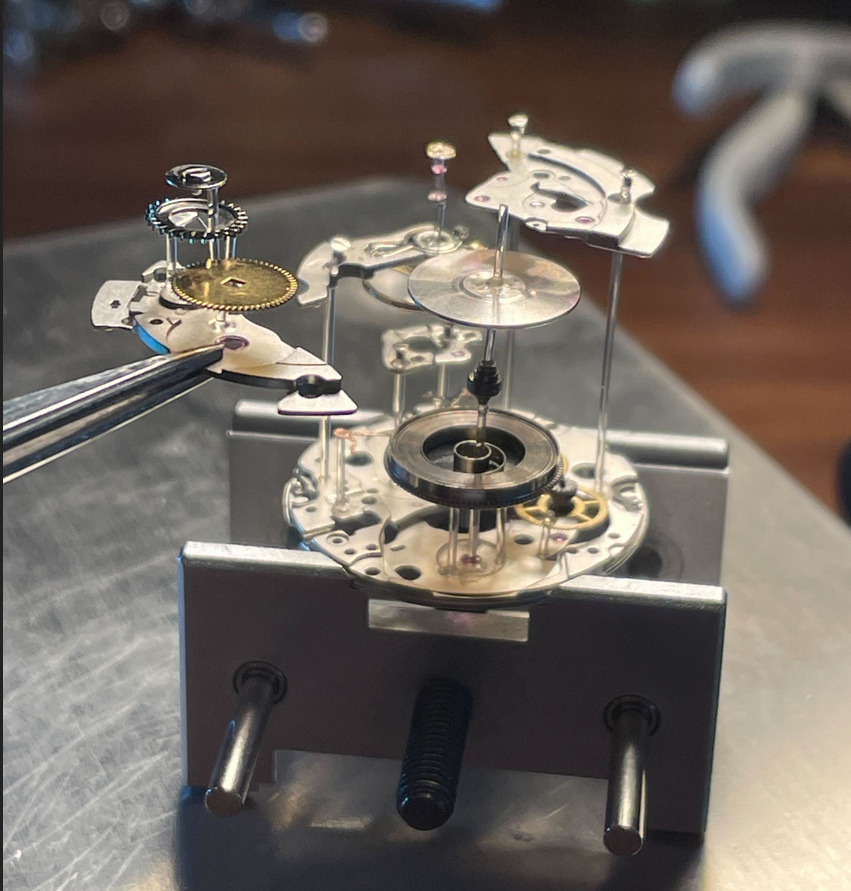
The third iteration incorporated the scissor lift lab jack into the
process which, together with helping hands, allowed for much greater
precision in bringing components together true and square. I'm also
committing another watchmaking sin by placing a small magnet in the jaws
of my self-closing tweezers to gently hold tiny screws. This allows me
to lower a screw into its target drop of CA glue and simply lift the
tweezers once the glue has set. This is a much more reliable method than
trying to hold onto a sub-millimeter screw with self-closing tweezers
whose gripping force I have little control over. Magnets are sinful in
this case because magnetism can cause all sorts of timing issues in
mechanical watch movements, but that's obviously not an issue in my
case.
I also started using a CA accelerator to speed up the assembly, because
waiting for glue to cure is painful. Spraying the accelerator onto my
work would create a huge mess, so instead I spray some into a lidded
container and use tweezers to pick up droplets of the stuff to deposit
accurately onto the glue joints. This stuff is too volatile and runny to
be picked up by a needle. For me, the most effective use of the CA
accelerant is to first place a drop of CA glue on one of the two mating
surfaces, then dip the other surface in accelerant and quickly bringing
them into contact. I believe this works well because the joint cures
along the interface instead of curing from the outside-in as is the case
when spraying accelerant after the joint has glue in it.
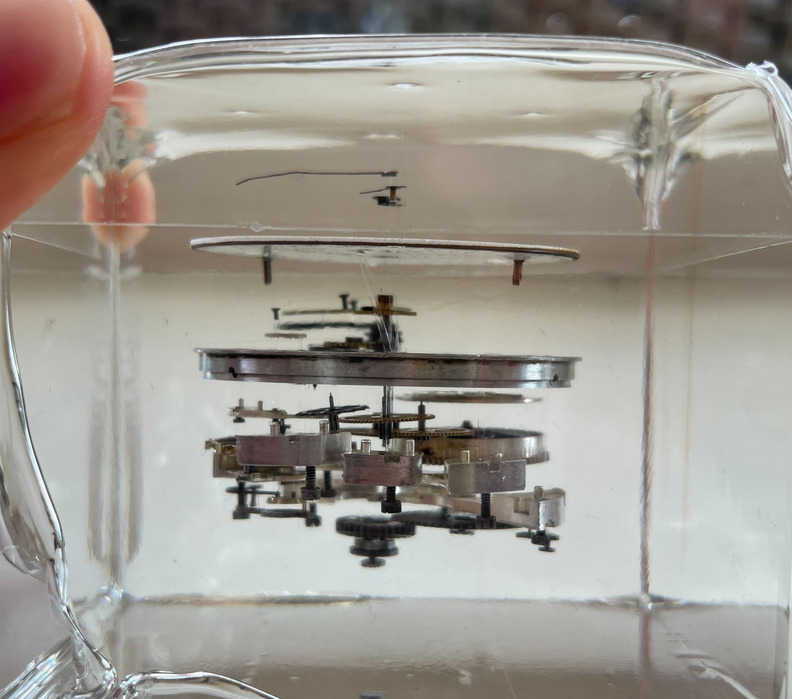
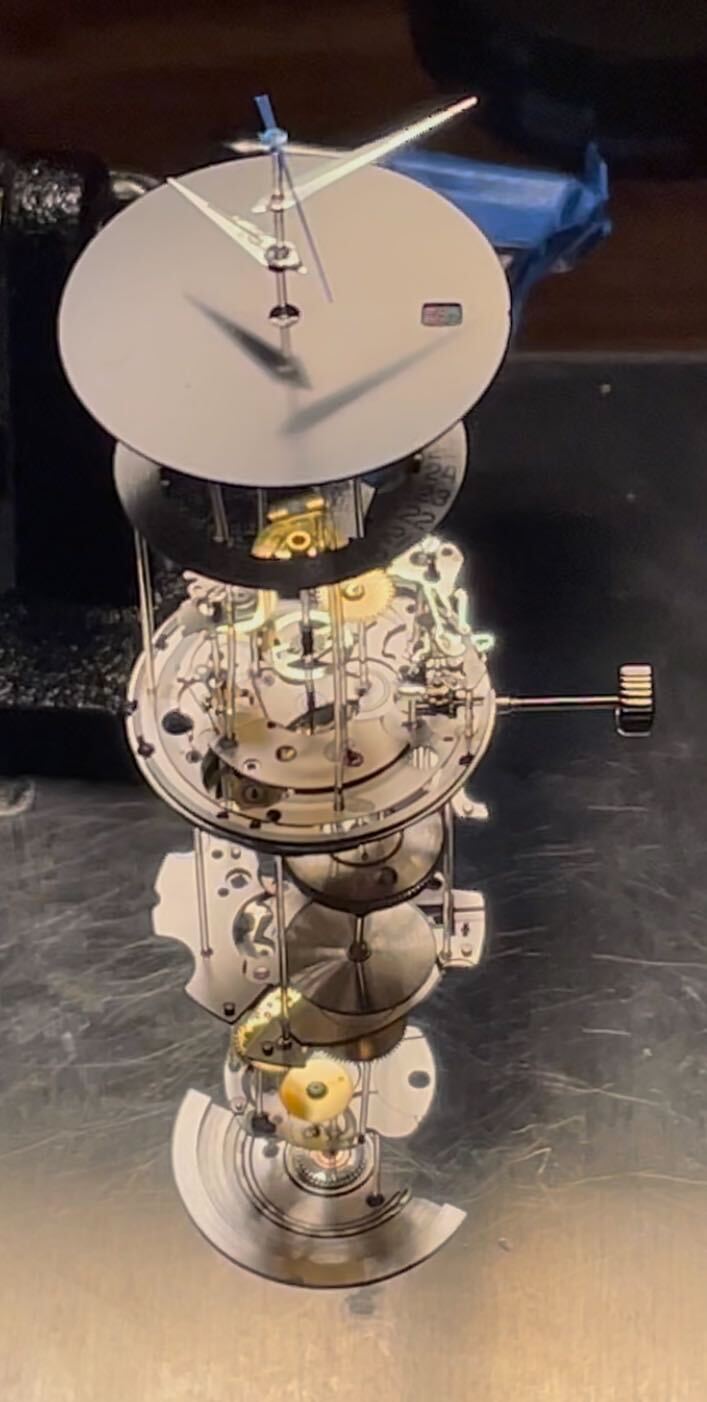
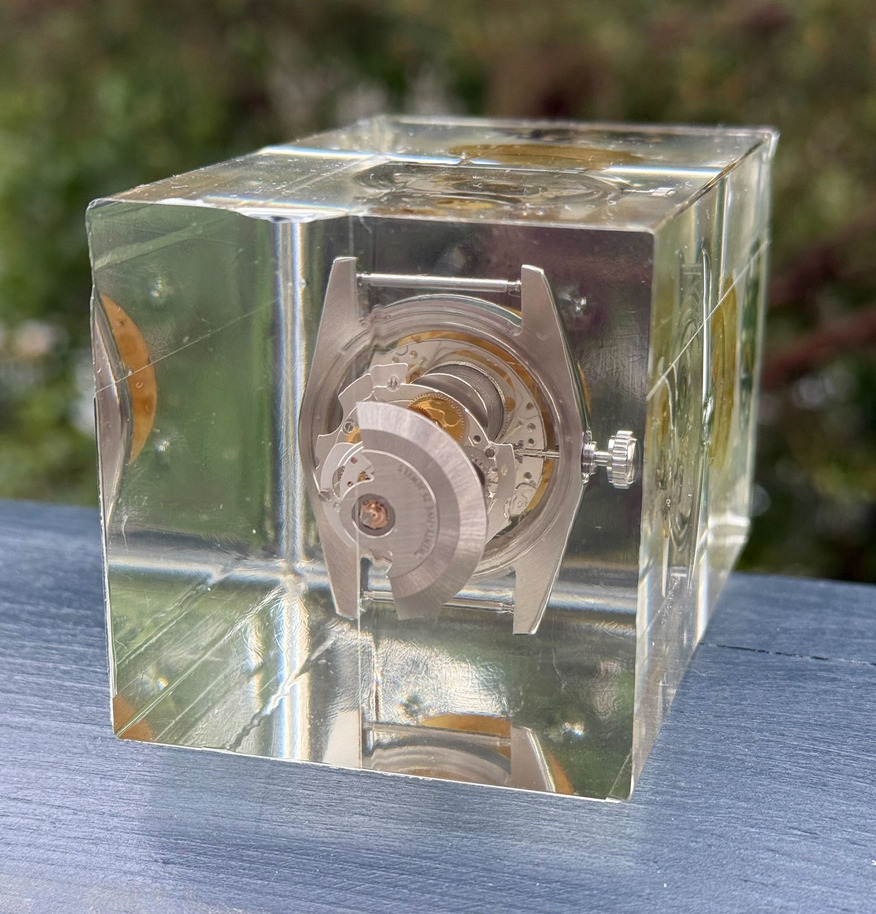
You may see that the balance wheel is hanging from the hairspring in
this casting. The balance wheel marks the end of the train of wheels and
releases tiny amounts of energy from the mainspring 18,000 times per
hour. The balance assembly is the heart of the movement and is also the
most delicate component, and I want to highlight that by stretching the
hairspring to show its form. These components are not glued in place,
and the balance wheel hangs freely from its spring, meaning I have to
cast the whole assembly upside-down to achieve this effect.
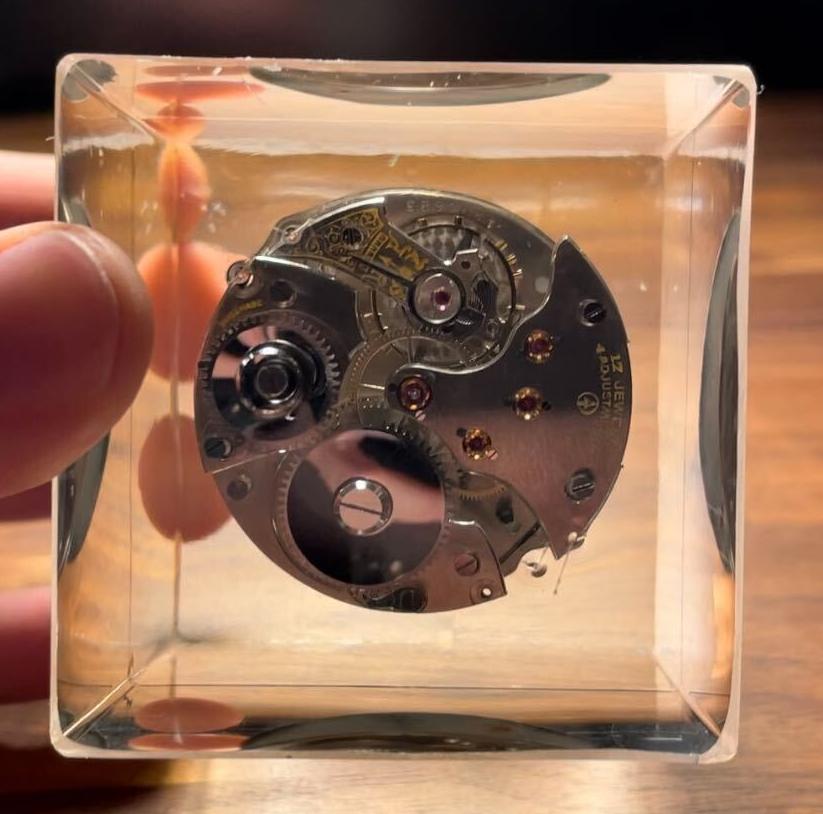
Protype #4: ETA-2824
At this point I figured I was ready to tackle the final boss of this
project: the ETA 2824 wristwatch movement that we've all seen in Bartosz Ciechanowski's
blog post. Well, I'll tackle the Chinese PT5000 clone movement
instead, because I can't justify spending €300 on a genuine movement
only to ensure it will never run again.
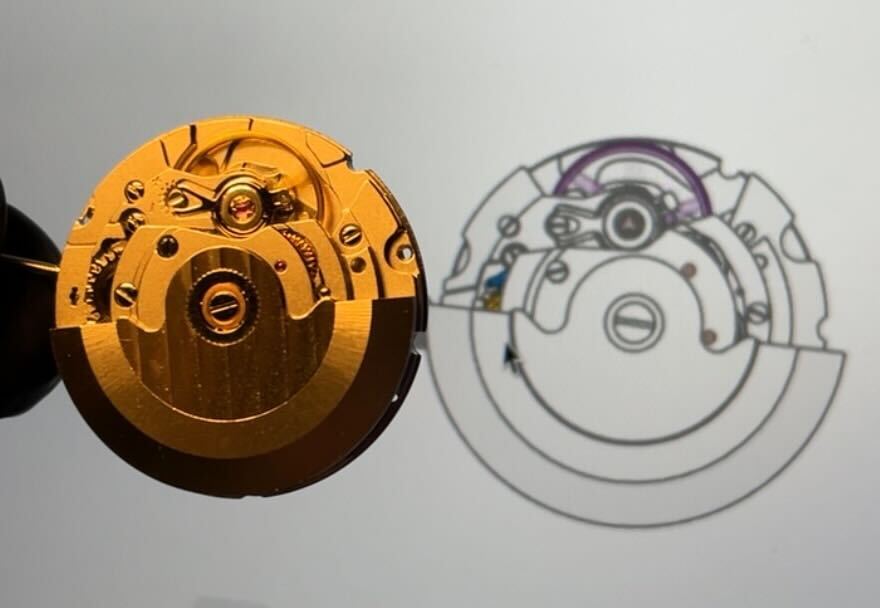
Comparing my PT5000 to Bartosz's render.
This movement arrived from China in good working order---I was actually
suprised at its performance out of the box. It ran with good amplitude
and little positional variance between horizontal and vertical
positions. I became less and less impressed as I disassembled the
movement prior to cleaning, though, because it was absolutely drenched
in oil. Many of the bridges had sharp burrs that broke off during
cleaning. Nothing was broken though. All in all, these movements really
need a proper service before putting them to service. That's not an
issue here though.
I was worried that the much smaller components would be challenging to
work with, but I found the process to be essentially the same as for
larger pocket watch movements. My 0.7 mm nylon fishing wire still fits
through most of the screw holes and the lab jack makes alignment a
breeze.
Some components needed special care, in particular the balance shock
springs that protect the delicate pivots of the balance staff from
shocks. These aren't normally found on older pocket watch movements
which is why a broken balance staff is one of the most common failure
modes of pocketwatches. Shock springs are fragile and are, in my
opinion, among the most difficult components to handle when servicing a
watch. Of course, I want to also explode the balance assembly, so I
needed a way to suspend the shock springs above the capstone jewel. By
laying the spring down flat on silicone and placing a drop of CA glue on
it, the surface tension of the glue fills in the inner disk. Once cured,
the spring with its hard and transparent interior can be lifted off the
silicone. This is how the luminous material (lume) is applied to the
hands of a watch---another watchmaker's trick.
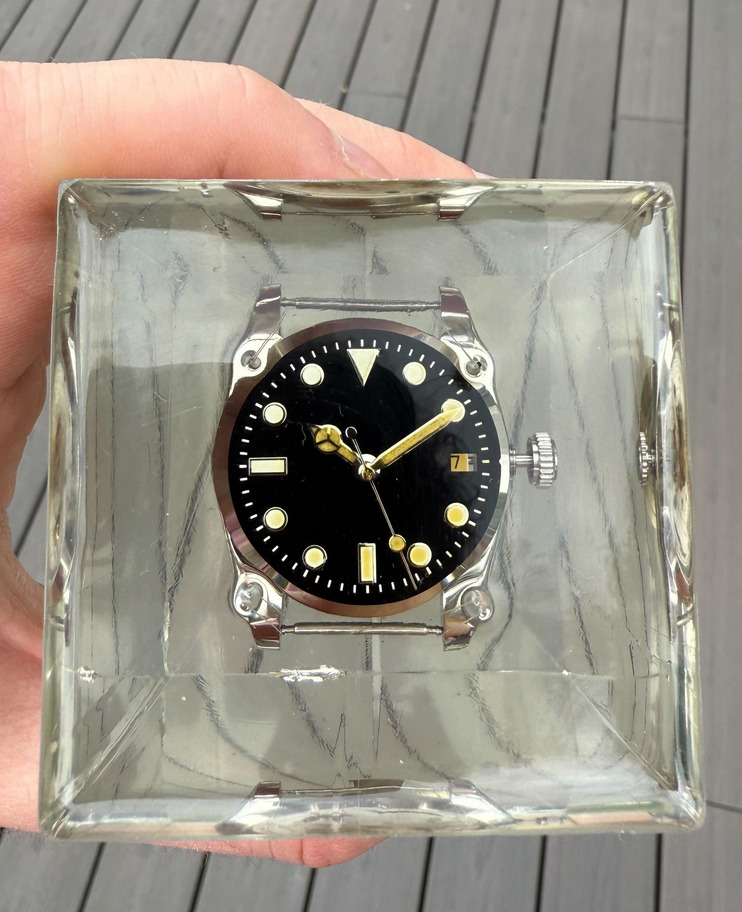
The assembly process was luckily uneventful, and I finished the build
off with a black dial and a random set of hands from eBay.
Unfortunately, the casting process went completely south. Only after I
had created a mold, mixed, degassed, and poured resin, did I realize
that my mold was just barely too tall to fit comfortably in the vacuum
chamber. With some hasty modifications to the scaffolding that supported
the exploded model, I was able to pull a reasonable vacuum on it, but it
left the exploded model crooked. To add insult to injury, the resin
seems to have dissolved the paint on the date indicator ring, which left
milky streaks throughout the casting.
All in all, I spent roughly 18 hours stripping, cleaning and assembling
the exploded view of the PT5000. With improved technique I might get
this down below 15 hours, but it's very tedious work, and rushing
means I'll knock something off and have to redo work. Good to know,
because I will be doing this again until I get it right.
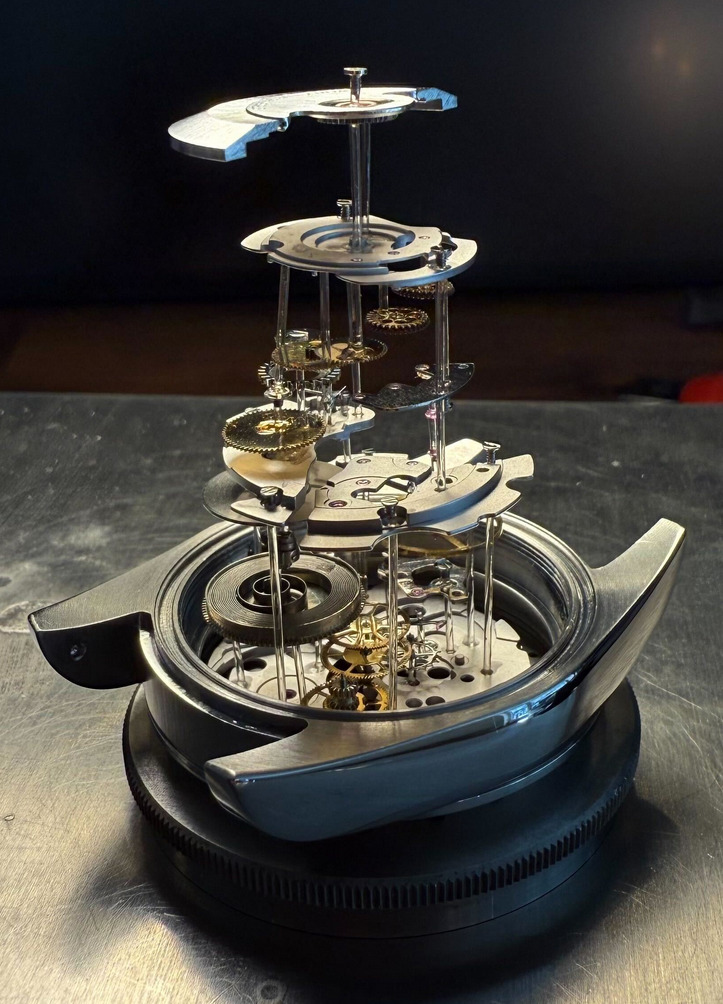
The PT5000 disassembles nicely into a steampunk whale.
Installing the barrel bridge assembly.
Assembly complete!
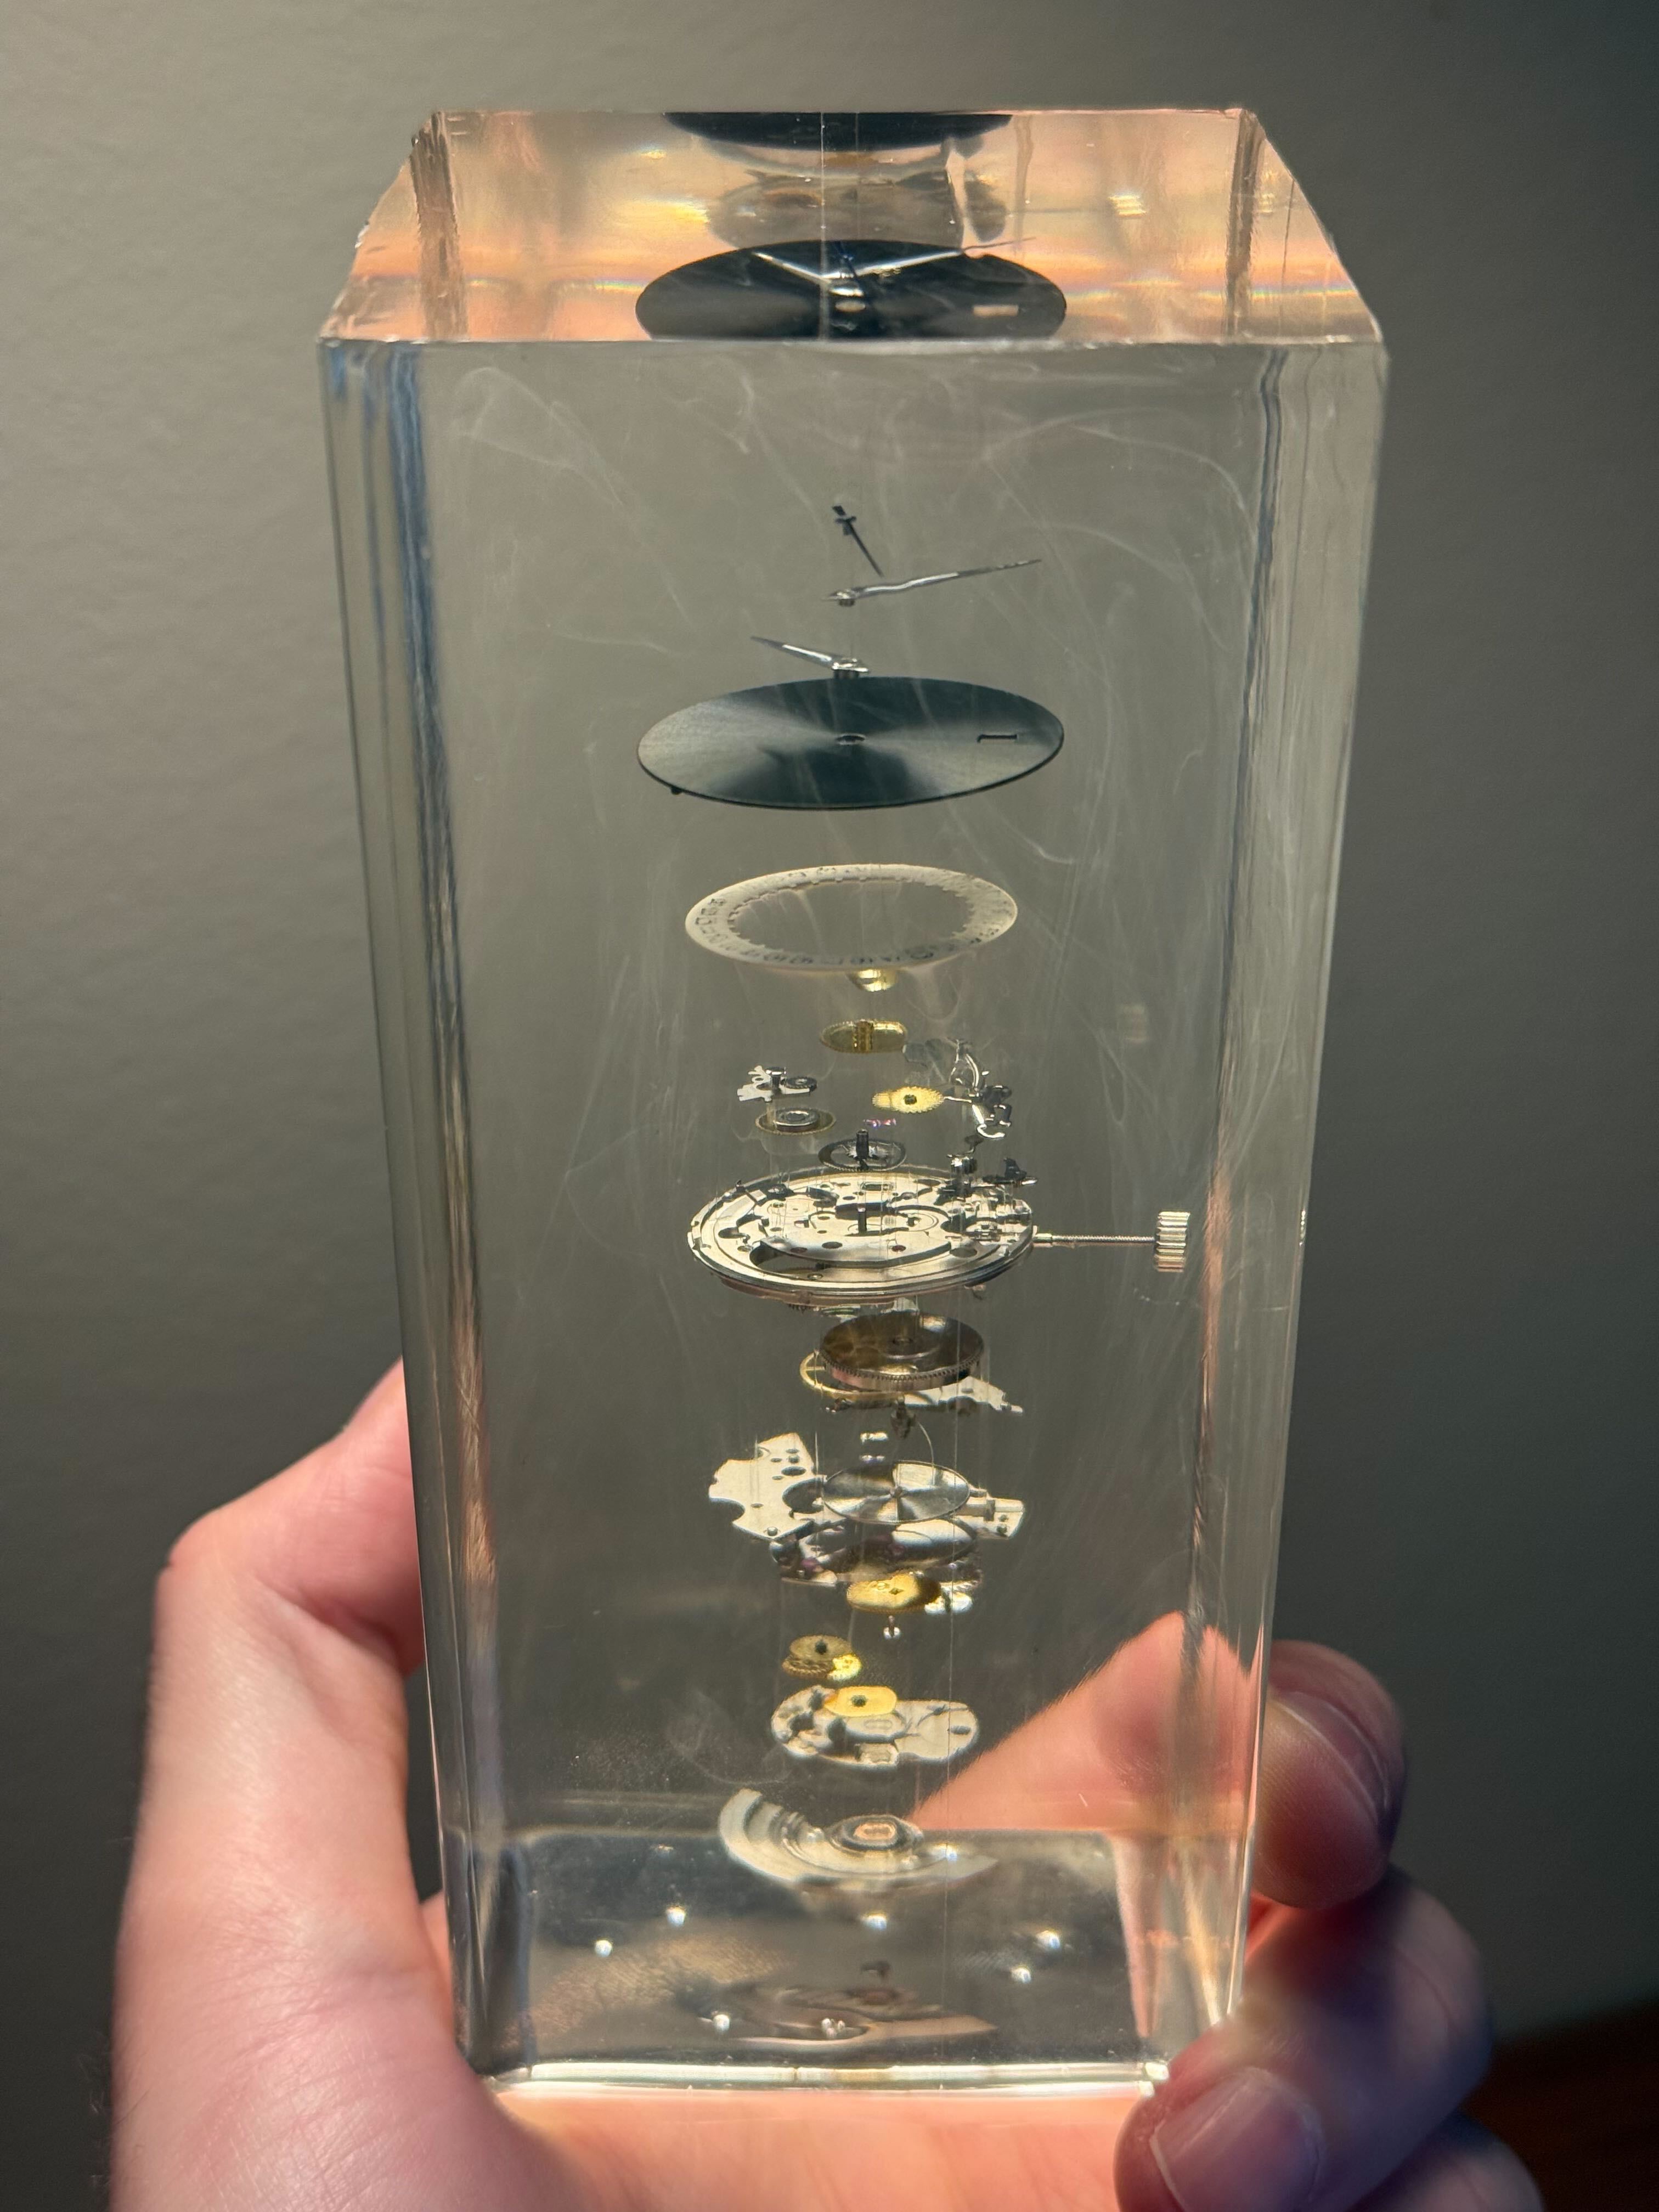
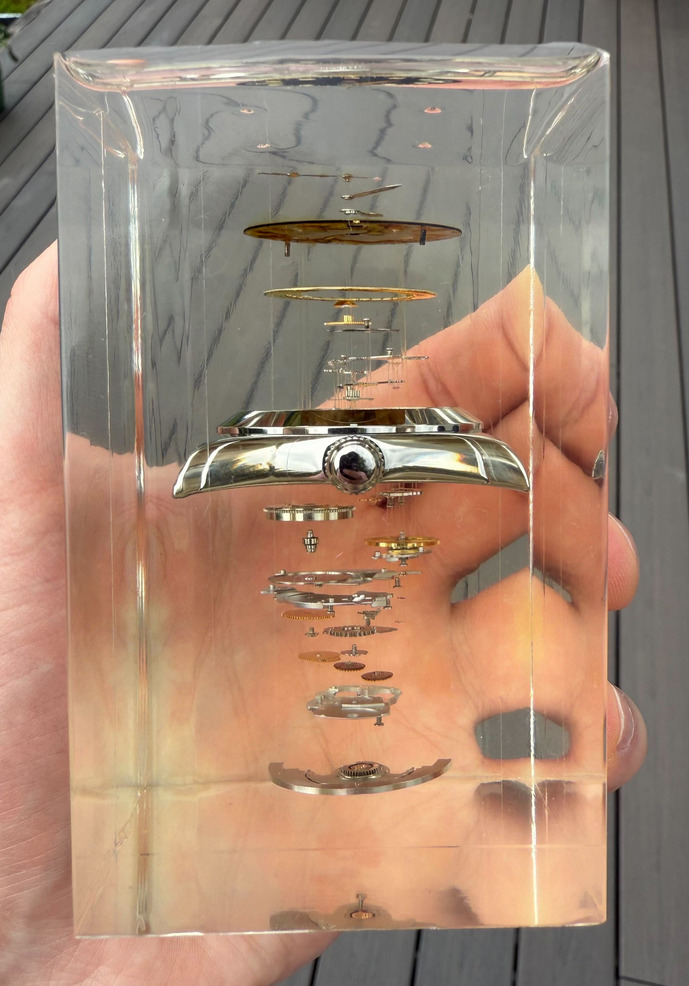
Final casting. The paint on the date ring, dial and hands dissolved. Also, the model is crooked.
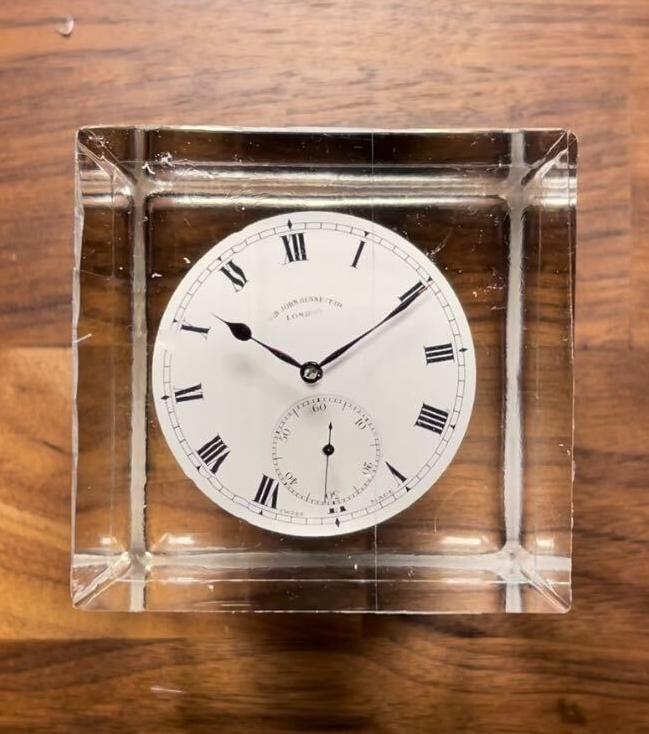
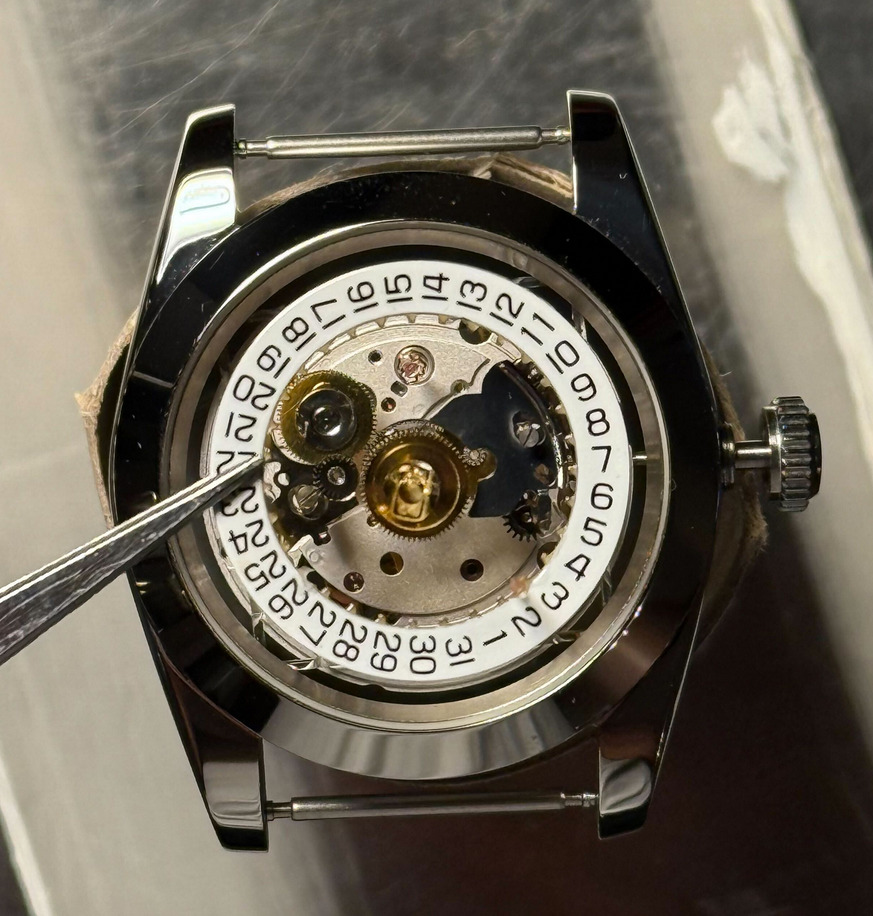
End game: the wristwatch
Prototype #4 has a couple flaws which I'd like to fix before calling this project done. The process of assembling the model is more or less nailed down: I just need to find a way to seal any painted surface before casting, as well as try to remember that my vacuum chamber has limited volume. I bought another PT5000, this time in a complete watch with case and a metal band, and started experimenting with sealing the painted surfaces. Here's what didn't work:
- CA glue dissolves paint just as readily as epoxy resin. It might work on simple paint-jobs like the chapter indices and the hands, but the date ring has crisp lines (the numbers) which I need to preserve.
- UV curable CA glue didn't cure on top of the paint. No idea why.
- Same with UV curable epoxy resin.
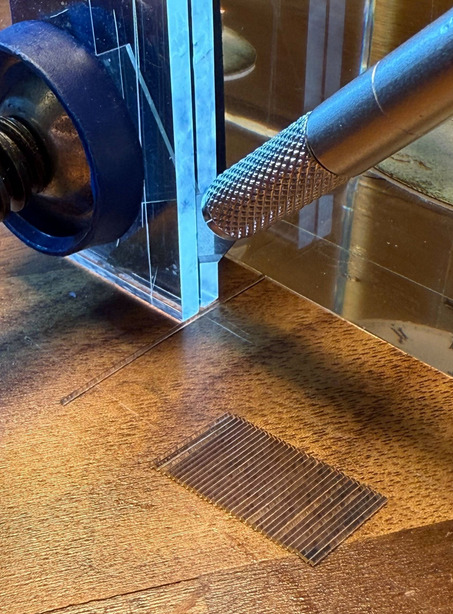
Janky but effective cutting jig for fishing line.
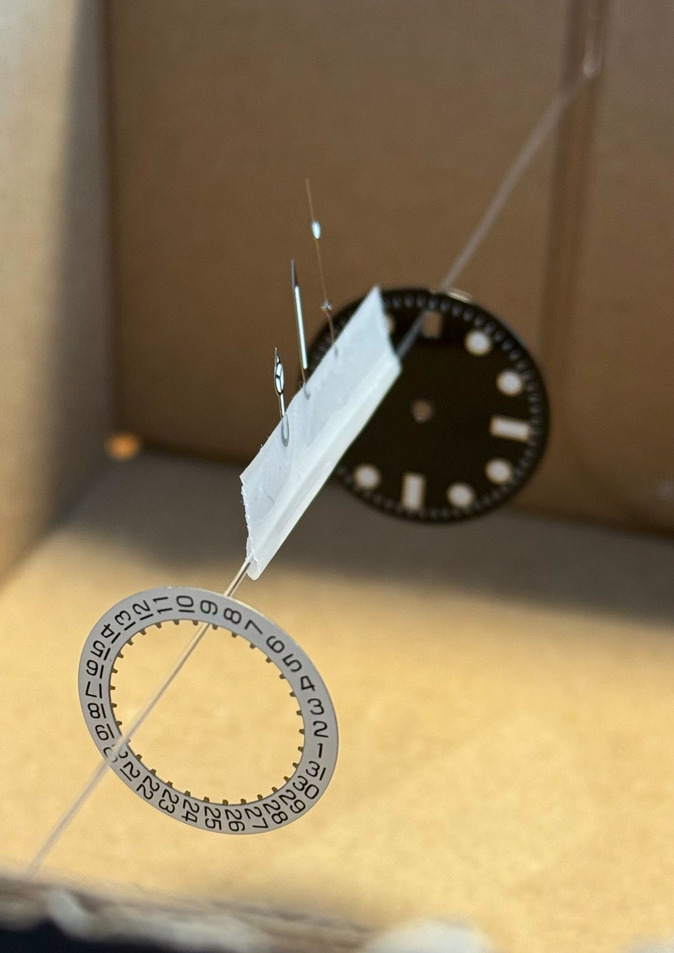
Painting the dial, hands and calendar ring...
The watchmaker's side of the movement is assembled and fastened to the case.
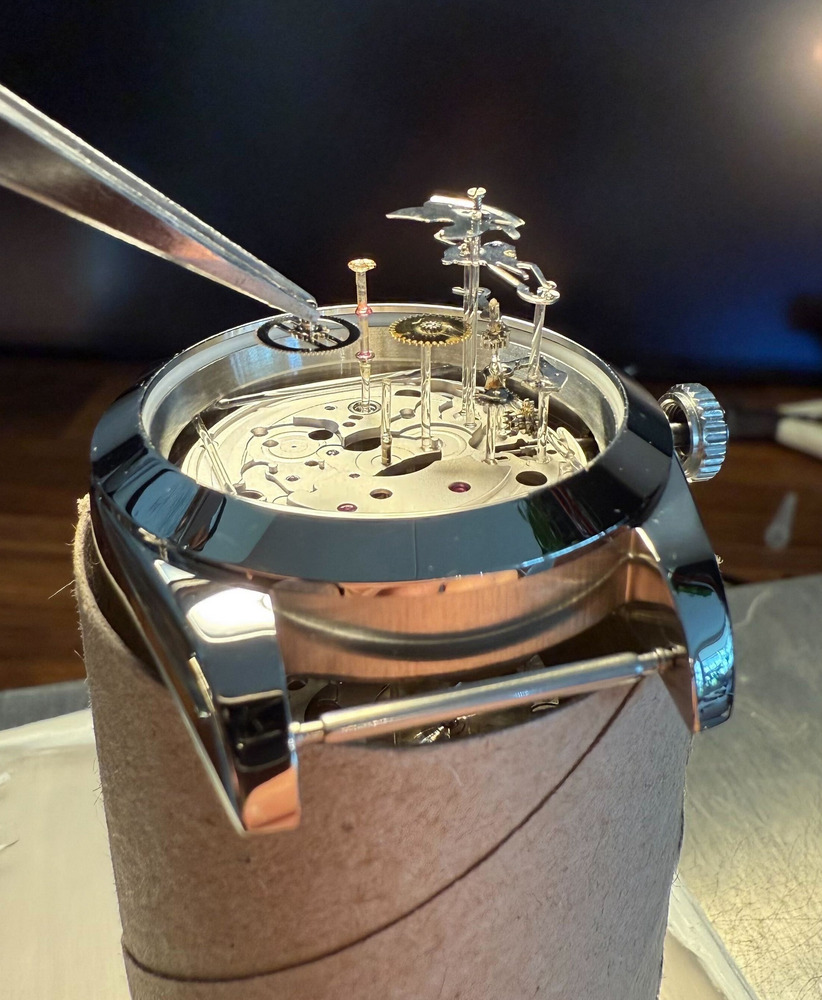
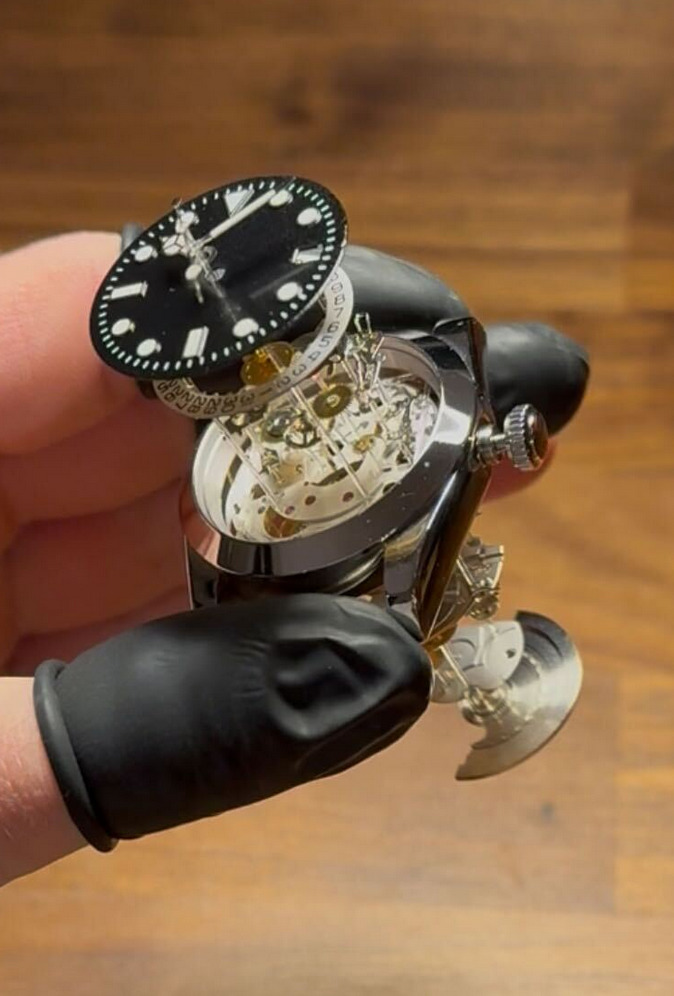
Our watch is held by a stiff cardboard tube (okay, a toilet roll core)
to keep the finished half suspended mid-air while work continues on
the dial-side.
Aligning the date ring...
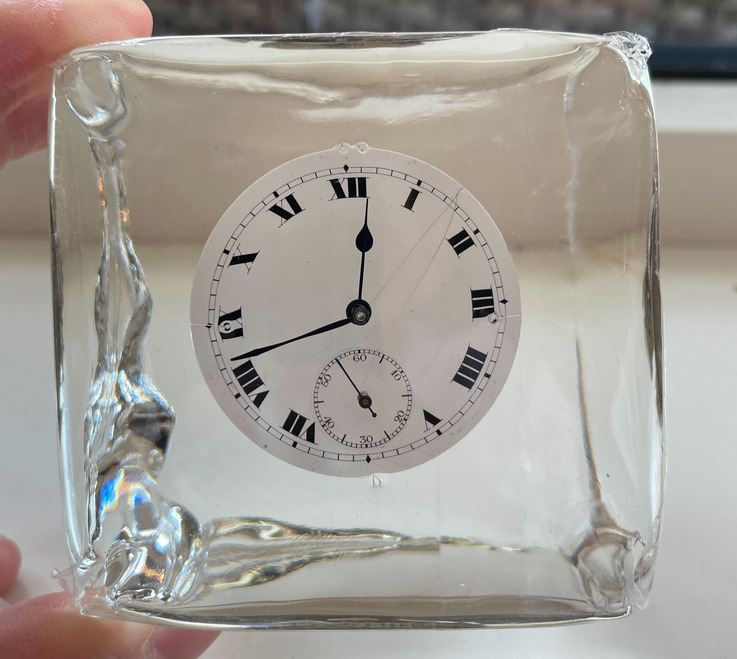
Done! I wish I could keep it in this form, but it's too fragile.
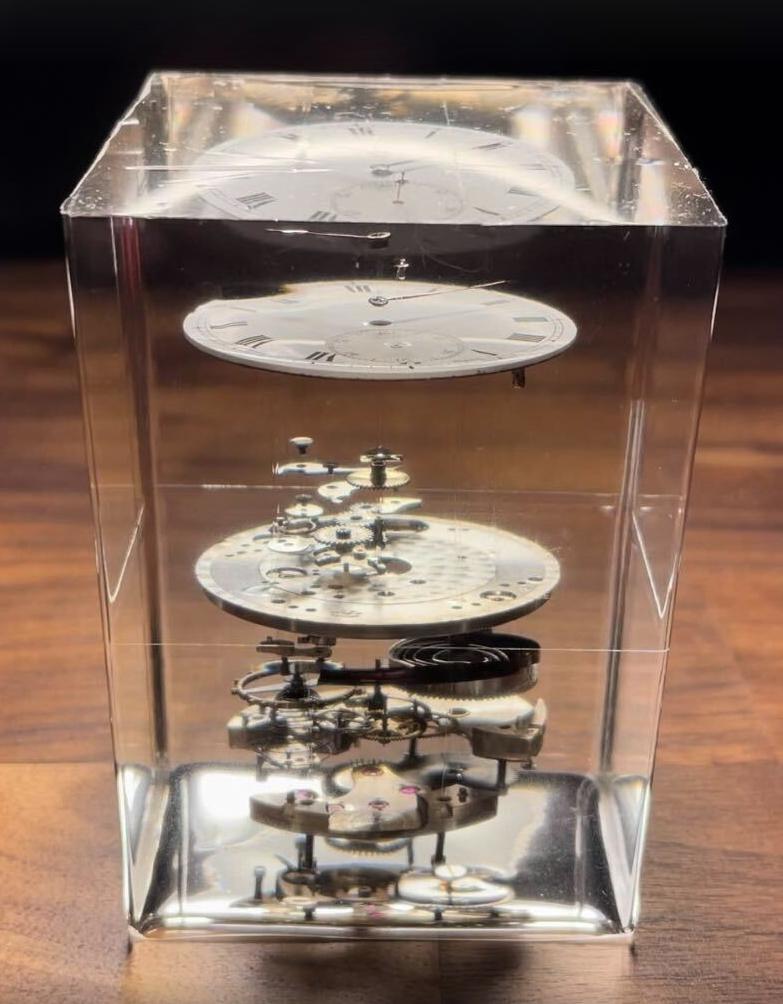
Final result
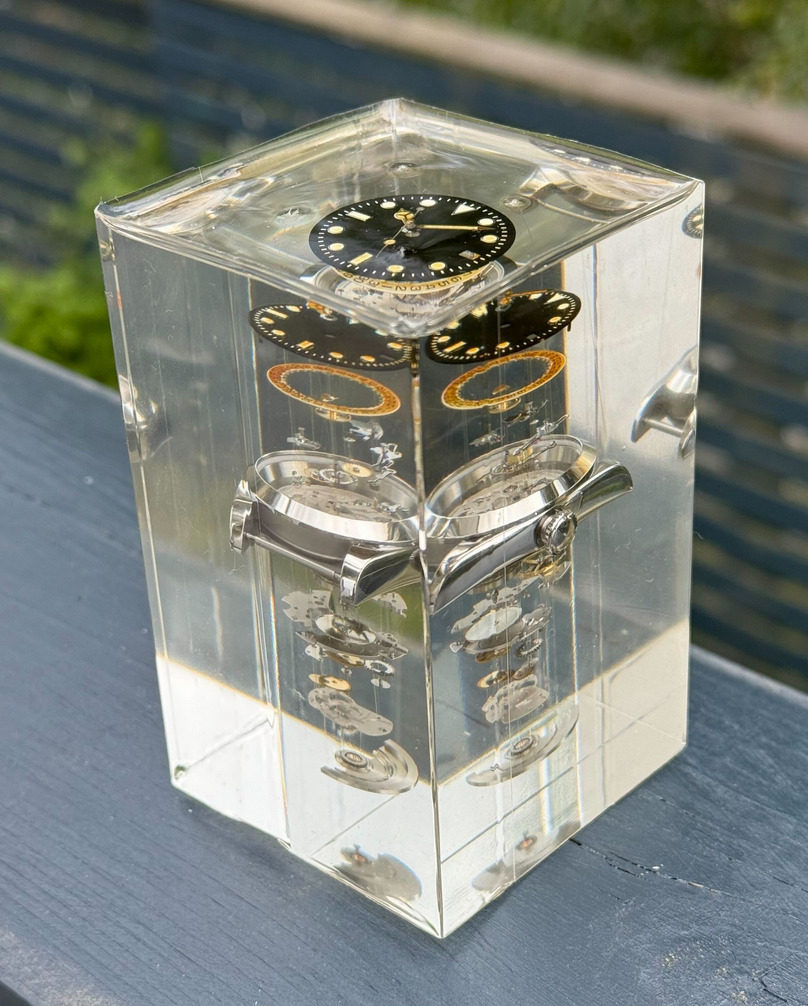
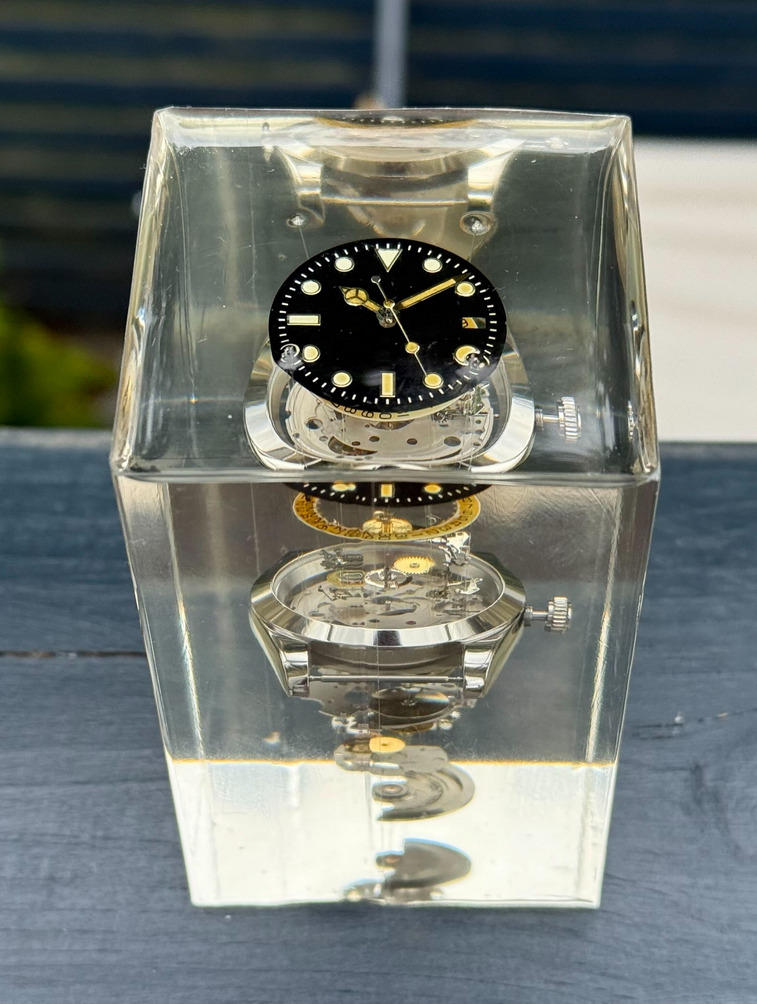
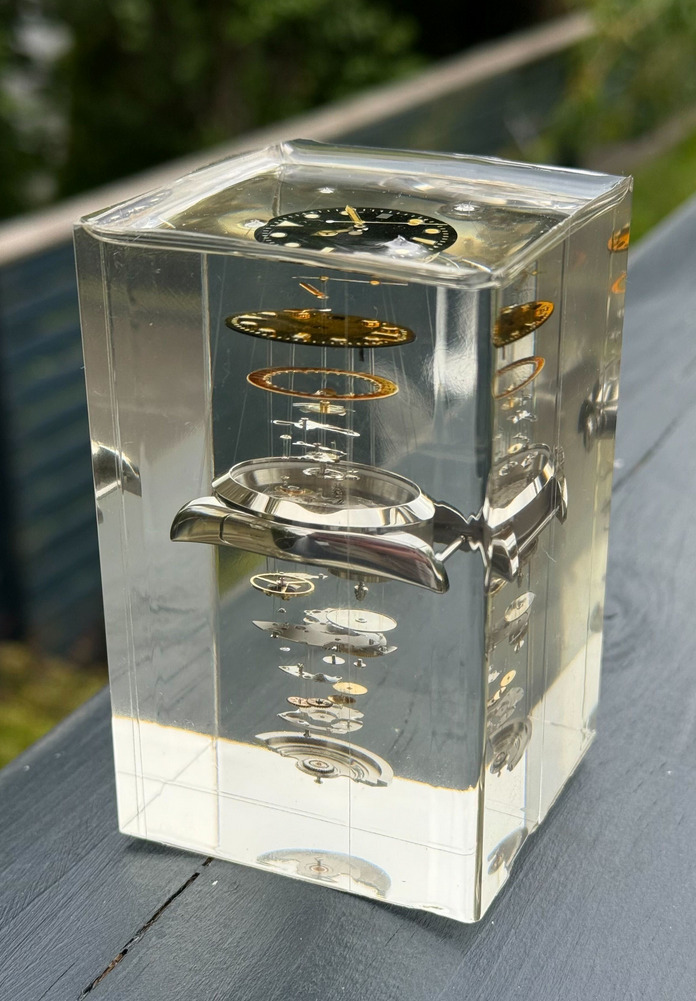
I don't have the tools or knowledge required to sand this down to a perfect mirror finish, but that's okay. After 2.5 years of noodling around with this, I've achieved what I set out to do, and I'm pretty happy with the result, even if it is difficult to photograph. Figured I'd write this post to get some honest feedback, maybe even some tips, in case I decide to continue working on this... I mean, more interesting wristwatch movements do exist!
Bartosz, if you are reading this, contact me and I'll send you the final casting. This project would never have happened without your blog post.
What's Your Reaction?
 Like
0
Like
0
 Dislike
0
Dislike
0
 Love
0
Love
0
 Funny
0
Funny
0
 Angry
0
Angry
0
 Sad
0
Sad
0
 Wow
0
Wow
0


.jpg)