


![[Podcast - Echoes of Africa ] : Uzi Freyja libère son enfant intérieur](http://static.euronews.com/articles/stories/09/31/91/24/640x360_cmsv2_b8d4dcca-e153-500c-9535-573864e58d44-9319124.jpg?1749232231#)


A masochist's guide to web development
A masochist’s guide to web development
Table of contents
Introduction
I have recently worked on making a web application out of my latest Rubik’s cube optimal solver. This involved building a rather complex C code base (with multithreading, SIMD, callback functions and whatnot) to WebAssembly via Emscripten, and writing a minimal amount of JavaScript and HTML for the frontend.
This whole process was complex, tiring and at times frustrating - but eventually it was a success! Not only I accomplished my goal, but I have learnt a lot along the way. After finishing the work, I decided to write down all that I have learnt and share it with the world with this post.
You may be wondering why one should do such a thing instead of either rewriting their code base in a more web-friendly language, or distributing their app using a native GUI framework. The main reason to use WebAssembly is that it can provide near-native performance (or so they claim) while running inside a web browser; this gives you all the portability of a web app without too much of a performance drawback, something that would not be possible with an interpreted language such as JavaScript.
So, what is this blog post? A tutorial for web development? I am not sure about this, but if it is, it is definitely not a normal one. As the title suggests, you should not start from this guide unless you just love banging your head against the wall. If you are looking for a sane guide to web development, I strongly advise you head on to the Mozilla Developer Network tutorials page and start from there.
But if you are a C or C++ developer looking to port a program or library to the web, then you are in the right place. With this post I am going to walk you through the process of building an increasingly complex library that can run in a web browser. Make sure you are sitting comfortably and be ready to sweat, because I am not going to shy away from the hard stuff and the complicated details.
To follow this tutorial you won’t need much experience with web development, but some familiarity with HTML and an idea of what JavaScript will be useful. It will also help to know that you can access your browser’s JavaScript console and other developer tools by pressing F12, at least on Firefox or Chrome - but I guess I have literally just taught you that, if you did not already know it. For all the rest, I’ll make sure to add many hyperlinks throughout the text, so you can follow them if something is new to you.
A little disclaimer: although I am a somewhat experienced C developer,
I had very little web development experience before embarking in
this adventure. If you are a web developer, you may find errors in
this post that are going to make you laugh at my ignorance. If you do,
I’d appreciate it if you could report them to me by sending an email to
[email protected]!
With this out of the way, let’s get started!
Setting things up
The examples used in this tutorial are all contained in a git repository, which you can find either on my git page or on github.
In order to follow them you are going to need:
- A working installation of Emscripten (which also includes Node.js). Refer to the official website for installation instructions.
- A web server such darkhttpd
or the Python
http.serverpackage; the examples will use darkhttpd.
I have only tested all of this on Linux, but everything should work exactly the same on any UNIX system. If you are a Windows user, you can either run everything inside WSL, or you can try and adjust the examples to your system - if you choose this second option, I’ll happily accept patches or pull requests :)
Hello world
Let’s start with the classic Hello World program:
#include

int main() {
    printf("Hello, web!\n");
}
You can compile the code above with
emcc -o index.html hello.c
And if you now start a web server in the current folder, for example with
darkhttpd . (the dot at the end is important), and open a web browser to
localhost:8080 (or whatever port your web server
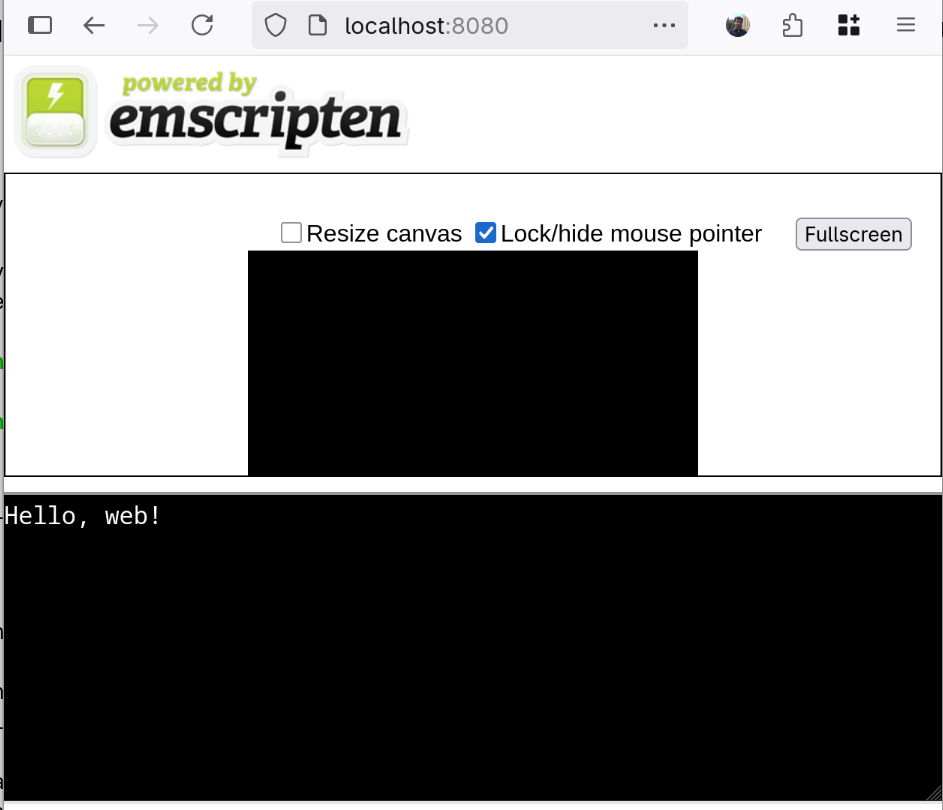
uses), you should see something like this:
As you can see, the compiler generated a bunch of extra stuff around you print statement. You may or may not want this, but for now we can take it as a convenient way to check that our program works as expected.
There are other ways to run this compiled code. With the command above, the compiler should have generated for you 3 files:
index.html- the web page in the screenshot above.index.wasm- the actual compiled code of your program; this file contains WebAssembly bytecode.index.js- some JavaScript glue code to make it possible forindex.wasmto actually run in a browser.
If you don’t specify -o index.html, or if your specify -o followed
by a filename ending in .js, the .html page is not going to be
generated. In this case (but also if you do generate the html page),
you can run the JavaScript code in your terminal with:
node index.js
In later examples, the same code may not work seamlessly in both a web browser and in Node.js - for example, when dealing with persistent data storage. But until then, we can generate all three files with a single command and run our code in either way.
It is also possible to ask Emscripten to generate only the .wasm file,
in case you want to write the JavaScript glue code by yourself. To do
this, you can pass the -sSTANDALONE_WASM option to emcc. However,
in some cases the .js file is going to be generated even when this
option is used, for example when building a source file without a main()
entry point. Since this is something we’ll do soon, we can forget about
this option and just take it as a fact that the .wasm files generated
by emscripten require some glue JavaScript code to actually run,
but in case you are interested you can check out
the official documentation.
You can find the code for this example, as well as scripts to
build it and run the web server, in the directory 00_hello_world
of the git repository
(git.tronto.net,
github).
Anyway, now we can build our C code to run in a web page. But this is probably not the way we want to run it. First of all, we don’t want to use the HTML template provided by Emscripten; but more importantly, we probably don’t want to write a program that just prints stuff to standard output. More likely, we want to write some kind of library of functions that can be called from the front-end, so that the user can interact with our program via an HTML + JavaScript web page. Before going into that, let’s take a break to discuss what we are actually compiling our code to.
Intermezzo I: What is WebAssembly?

WebAssembly is a low-level language meant to run in a virtual machine inside a web browser. The main motivation behind it is running higher-performance web applications compared to JavaScript; this is made possible, by its compact bytecode and its stack-based virtual machine.
WebAssembly (or WASM for short) is supported by all major browsers since around 2017. Interestingly, Emscripten, the compiler we are using to translate our C code to WASM, first appeared in 2011, predating WASM by a few years. Early on, Emscripten would compile C and C++ code into JavaScript, or rather a subset thereof called asm.js.
Just like regular assembly, WASM also has a text-based representation. This means that one could write WASM code directly, assemble it to bytecode, and then run it. We are not going to do it, but if you are curious here is a simple example (computing the factorial of a number, taken from Wikipedia):
(func (param i64) (result i64)
    local.get 0
    i64.eqz
    if (result i64)
        i64.const 1
    else
        local.get 0
        local.get 0
        i64.const 1
        i64.sub
        call 0
        i64.mul
    end)
As you can see, it looks like a strange mix of assembly and Lisp. If you want to try and run WASM locally, outside of a web browser, you could use something like Wasmtime.
Until early 2025, the WASM “architecture” was 32-bit only. One big
limitation that this brings is that you cannot use more that 4GB
(232 bytes) of memory, because pointers are only 32 bits
long; moreover, your C / C++ code may need some adjustments if it
relied on the assumption that e.g. sizeof(size_t) == 8. At the
time writing a new standard that enables 64 bit pointers, called
WASM64, is supported on Firefox and Chrome, but not on Webkit-based
browsers such as Safari yet. Depending on when you are reading this,
this may have changed - you can check the status of WASM64 support
here.
Building a library
Back to the main topic. Where were we? Oh yes, we wanted to build a C library to WASM and call it from JavaScript. Our complex, high-performance, math-heavy library probably looks something like this:
library.h (actually, we are not going to need this):
int multiply(int, int);
library.c:
int multiply(int a, int b) {
    return a * b;
}
Or maybe it is a bit more complicated than that. But we said we are
going to build up in complexity, and this is just the beginning, so
let’s stick to multiply().
To build this library you can use:
emcc -o library.js library.c
As we saw before, this is going to generate both a library.js and a
library.wasm file. Now we would like to call our library function
with something like this
program.js:
var library = require("./library.js");
const result = library.multiply(6, 7);
console.log("The answer is " + result);
(The require() syntax above is valid when running this code in Node.js,
but not, for example when running in a browser. We’ll see in the next
session what to do in that case, but for now let’s stick to this.)
Unfortunately, this will not work for a couple of reasons. The reason
first is that Emscripten is going to add an underscore _ to all our
function names; so we’ll have to call library._multiply(). But this
still won’t work, because by default the compiler does not export all
the functions in your code - that is, it does not make them visible to
the outside. To specify which functions you want to
export, you can use the -sEXPORTED_FUNCTIONS flag, like so:
emcc -sEXPORTED_FUNCTION=_multiply -o library.js library.c
And now we finally have access to our multiply() function…
$ node program.js
Aborted(Assertion failed: native function `multiply` called before runtime initialization)
…or maybe not. If you are new to JavaScript like I was a few weeks ago, you may find this error message surprising. Some runtime must be initialized, but can’t it just, like… initialize before trying to run the next instruction?
Things are not that simple. A lot of things in JavaScript happen
asynchronously, and in these situations you’ll have to either use
await
or a
callback function.
So we’ll have to do something like this:
var library = require("./build/library.js");

library.onRuntimeInitialized = () => {
    const result = library._multiply(6, 7);
    console.log("The answer is " + result);
};
And now we can finally run our program:
$ node program.js
The answer is 42
The code for this example can be found in the 01_library folder in
the git repository
(git.tronto.net,
github).
Intermezzo II: JavaScript and the DOM
If we want to build an interactive web page using JavaScript, we’ll need a way for our script to communicate with the page, i.e. a way to access the HTML structure from JavaScript code. What we are looking for is called Document Object Model, or DOM for short.
For example, if you have a paragraph with some text in your HTML:
Hello!
you can access this text from JavaScript like this:
var paragraph = document.getElementById("myParagraph");
paragraph.innerText = "New text!";
Here we are selecting the paragraph HTML element using its ID, and we
are changing its text via its innerText property, all from JavaScript.
Let’s see a more complex example:
HTML:
JS:
var button = document.getElementById("theButton");
var counter = 0;

button.addEventListener("click", () => {
    counter++;
    button.innerText = "I have been pressed " + counter + " times!";
});
In the example above we add an event listener to a button: the (anonymous) function we defined is going to be called every time the button is clicked. And since this is a web page, I guess I can show you what this actually looks like.
Behold, the dynamic button:
If you are completely new to web development, you may be wondering
where you should write this JavaScript code. One option is to write it
in the same HTML file as the rest of the page, inside a
x